I use GHUnit and OCMock in my app development, but each time I set up a new project in the past, it felt klunky and error prone. I either copied an old one to start and renamed and deleted things, or I created a new one and dragged chunks from old projects into it. I grew weary enough of this process that I decided it was time to create an Xcode project template with my typical setup.
I recently created an Xcode project template to do all this, and I decided to write a step-by-step description to help others do something similar. It is a simpler project than my template, but covers all the required steps. It might be useful to you as-is, or perhaps it just gives you the one missing piece in your battles with GHUnit, OCMock, or project templates.
These instructions are based on:
- Xcode 3.2.5
- GHUnit 0.4.7
- OCMock 1.7.0
and will cover these steps:
- Create a base application project
- Add a GHUnit based application test target
- Add OCMock to the application test target
- Create an Xcode project template from the project
General comments
I highly recommend creating a local source control project to save your work as you progress. Commit your changes often enough to make things easier on yourself. My practice is to do one thing at a time, get it working, and commit to my local .git repository. Every so often, usually after a major subtask is complete, I will also push my changes to a remote git repository.
These instructions will create a project structure with all files stored in the actual project directory, including the GHUnit and OCMock frameworks. It is better for your template to embed its dependencies rather than depend on external references.
These instructions assume everything we create or download will be in the directory ~/xcpt, but feel free to put them wherever you like.
After each step in the process, you should do a clean, build, and run for each target to validate the configuration and dependencies, and make sure your VCS includes all files and you have committed your changes.
I create projects and templates with more structure and configuration options than we will cover here. In order to focus on the core issues, I will be creating a simpler project structure than I normally use. I would suggest you create the simple project and template here first to ensure the steps work for you. Then create a customized version that matches how you normally set up your projects.
We will use the name TemplateBase for our project and derive several targets and file names from it. You can choose whatever name you wish, but for ease of editing the final project and turning it into a template, be consistent in your naming.
There are many more options for GHUnit, OCMock, and project templates, but they are outside the scope of these instructions. For more information, see the Other Links at the end of this post.
1. Create a base application project
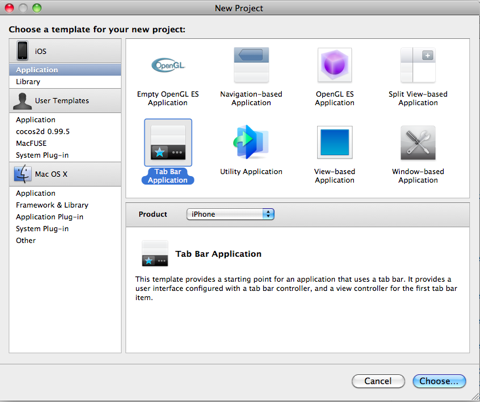 These instructions start with the Tab Bar Application template, but you should be able to build your template based on any of the standard application templates.
This step is straightforward but provides a baseline on which we can build our project.
- Create a new subdirectory xcpt in your home directory
- Open up Xcode, and create a new project based on the Tab Bar Application template
- Save the project as TemplateBase in ~/xcpt
- Make sure the project builds and runs in the simulator without error
If you like positive reinforcement, congratulations, step 1 is complete! If not, let’s move on anyway.
2. Add a GHUnit based application test target
 First, we need to add a test target to our project. GHUnit runs as as a standard application target, so create a new application target named TemplateBaseTests.
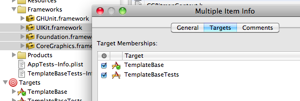 Add the existing frameworks in our project to this target by selecting them as a group, right-clicking them, and checking TemplateBaseTests in the Target Memberships list.
Next, we need a copy of GHUnit. Download the latest version, 0.4.27, from github, and unzip it into ~/xcpt.
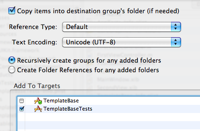 Open the ~/xcpt folder in Finder and drag the GHUnit.framework directory to the Frameworks group in your project. Make sure you:
- Check “Copy items into destination group’s folder (if needed)”
- Uncheck TemplateBase in the Add to Targets window,
- Check TemplateBaseTests in the Add to Targets window
 Now create a new group called “Test Classes”. Edit the info for the group, and under the Target tab, assign this group to TemplateBaseTests.
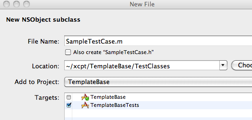 Create a new class named SampleTestCase in the Test Classes group. We do not need a header file for our unit test classes, so uncheck “Also create SampleTestCase.h”.
Replace the entire contents of the file with the following code:
#import <GHUnit/GHUnit.h>

@interface SampleLibTest : GHTestCase { }
@end

@implementation SampleLibTest

- (void)testSimplePass {
	// Another test
}

- (void)testSimpleFail {
	GHAssertTrue(NO, nil);
}

@end
 Open up the info dialog for the TemplateBaseTests target, and select the Build tab. Select “All configurations”, then find the “Other Linker Flags” setting and add “-all_load” and “-ObjC”.
Now select TemplateBaseTests-Info.plist and clear the value for the “Main nib file base name” property.
Our last step is to download the file GHUnitIOSTestMain.m and add it to our Test Classes group. Make sure you actually copy the file into the folder when you add it, we need this file to be a part of our directory structure for use in the template.
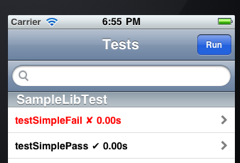 We are now ready to run our application tests. Change the active target to TemplateBaseTests, switch to the Simulator, and run the target. If everything is configured properly, your test application should start. Click the Run button, and you should see something similar to this:
Once you have the TemplateBaseTests target running correctly, double check your dependencies by doing a clean, build, and run on the TemplateBaseTests target.
3. Add OCMock to the application test target
Now that our appplication test target works, we want to add support for OCMock. Something changed in Xcode since 3.2.3 and older methods of integrating OCMock appear to have quit working. I have talked with developers who struggled with getting it working and gave up, but I have not had any problems with the method I use.
The method that works consistently for me is to add the OCMock.framework and the libOCMock.a to our test target, with one caveat: the library file that is part of the normal OCMock distribution does not work with iPhone projects, we need the library file that is part of the iPhone example project.
 First, download the standard installation file, ocmock-1.70.dmg and open it in Finder. Drag the OCMock.framework from the Release folder to the Frameworks group in your project. As with the GHUnit framework make sure you:
- Check “Copy items into destination group’s folder (if needed)”
- Uncheck TemplateBase in the Add to Targets window,
- Check TemplateBaseTests in the Add to Targets window
The library file in the dmg file will not work with your iPhone project, so we need the one from the iPhone example project. Download the file libOCMock.a from the example project page, open it in Finder, and drag it to the Frameworks group in your project. As with the frameworks, make sure to copy the file, and include it in the TemplateBaseTests target.
Now we need to add some test cases that use OCMock to our SampleTestCase. Replace the entire contents of the SampleTestCase.m with the following code:
#import <GHUnit/GHUnit.h> #import <OCMock/OCMock.h> @interface SampleLibTest : GHTestCase { } @end @implementation SampleLibTest - (void)testSimplePass { // Another test } - (void)testSimpleFail { GHAssertTrue(NO, nil); } // simple test to ensure building, linking, and running test case works in the project - (void)testOCMockPass { id mock = [OCMockObject mockForClass:NSString.class]; [[[mock stub] andReturn:@"mocktest"] lowercaseString]; NSString *returnValue = [mock lowercaseString]; GHAssertEqualObjects(@"mocktest", returnValue, @"Should have returned the expected string."); } - (void)testOCMockFail { id mock = [OCMockObject mockForClass:NSString.class]; [[[mock stub] andReturn:@"mocktest"] lowercaseString]; NSString *returnValue = [mock lowercaseString]; GHAssertEqualObjects(@"thisIsTheWrongValueToCheck", returnValue, @"Should have returned the expected string."); } @end
We are now ready to run our application tests. Change the active target to TemplateBaseTests, switch to the Simulator, and run the target. If everything is configured properly, your test application should start. Click the Run button, and you should see something similar to this:
Once you have the TemplateBaseTests target running correctly, double check your dependencies by doing a clean, build, and run on the TemplateBaseTests target.
4. Create an Xcode project template from the project
Creating a basic Xcode project template from your project requires some simple steps:
- Copying the project’s directory structure to the right place
- Renaming some files
- Changing references to your base project name in all the files in the project
Xcode looks for project templates in multiple locations, but the best place to put your new template is in the directory:
~/Library/Application Support/Developer/Shared/Xcode/Project Templates/Application
By placing your template here, future Xcode upgrades should leave it alone.If this directory does not exist, go ahead and create it. Copy your project directory “~/xcpt/TemplateBase” into this directory. The name of the directory is the name that Xcode will use when it displays it under “User Templates”, so you can rename the top level directory name to whatever you want displayed.
One minor cleanup item at this point is to remove the files “username.pbxuser” and “username.perspective3” from the TemplateBase.xcodeproj directory. You only need the “project.pbxproj” file.
At this point if you open Xcode and select New Project from the menu, your template will display in the list, and will even be usable. But, we do not want our new project to use file names like “TemplateBaseAppDelegate”, we want the file names to match whatever our new project name is, so we need to use the special file naming and tagging conventions that Apple uses in its templates.
There is a good post on CocoaDev that lists the available tags. When creating a new project, Xcode will do the appropriate text substitution in file names and contents based on these tags. Apple’s current style is to use three underscores “___” as delimiters. The CocoaDev post uses the older style of delimiters («tagname»), but the names are still the same.
For our example, we will only use two tags: “___PROJECTNAME___” and “___PROJECTNAMEASIDENTIFIER___”.
We cannot use Xcode to edit names since we will be changing contents of the internal structure of an Xcode project. Use command line tools or whatever editor you have on hand. I like to use TextMate for this sort of thing since it allows me to open an entire directory as a group and make changes en masse.
Before we edit any file contents, we need to rename the files in our project template directory to use the appropriate tag name. In the ‘~/Library/Application Support/Developer/Shared/Xcode/Project Templates/Application/TemplateBase’ directory, rename these files:
| Existing file | New name |
|---|---|
| Classes/TemplateBaseAppDelegate.h | Classes/___PROJECTNAMEASIDENTIFIER___AppDelegate.h |
| Classes/TemplateBaseAppDelegate.m | Classes/___PROJECTNAMEASIDENTIFIER___AppDelegate.m |
| TemplateBase-Info.plist | ___PROJECTNAMEASIDENTIFIER___-Info.plist |
| TemplateBase.xcodeproj | ___PROJECTNAME___.xcodeproj |
| TemplateBase_Prefix.pch | ___PROJECTNAMEASIDENTIFIER____Prefix.pch |
| TemplateBaseTests-Info.plist | ___PROJECTNAMEASIDENTIFIER___Tests-Info.plist |
At this point, if we created a project from this template, it would be broken — our filenames would be inconsistent with the internal references to those files, so we now need to edit all the references to use tag names as well. These files all contain the string “TemplateBase” and need to be edited.
- Classes/___PROJECTNAMEASIDENTIFIER___AppDelegate.h
- Classes/___PROJECTNAMEASIDENTIFIER___AppDelegate.m
- Classes/FirstViewController.h
- Classes/FirstViewController.m
- FirstView.xib
- MainWindow.xib
- SecondView.xib
- ___PROJECTNAME___.xcodeproj/project.pbxproj
- ___PROJECTNAMEASIDENTIFIER____Prefix.pch
- main.m
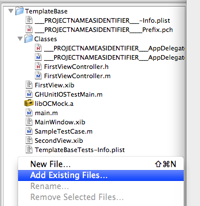 I will use TextMate in my instructions, but any editor should do. Just make sure you don’t miss a file.
Open the top level directory for your template using TextMate. Evidently TextMate recognizes the framework and Xcode project file directories, so it does not add them by default. We need to add just the Xcode project file directory to our list by opening it up specifically inside this TextMate session. Right click on the empty space below the existing file names, select “Add Existing Files”, then select the directory name “___PROJECTNAME___.xcodeproj”.
Now do a global find and replace, changing all references of “TemplateBase” to “___PROJECTNAMEASIDENTIFIER___”. Save your changes, and your project template should be complete.
You should now be able to create a new project based on this template. Run both the application and test targets in the simulator on your newly created project to verify that.
Other Links
I have kept the instructions pretty minimal in this example, but there are obviously a lot of additional things you can do. Here are several links I found useful while working with GHUnit, OCMock, and Xcode project templates. If you had any problems with my example, perhaps one of these links will help you better!
Zip files of Project Templates
- TemplateBase, the project template I created using these instructions
- IGTestableApplication, one of the project templates I use
GHUnit
OCMock
- OCMock home
- Making Fun of Things with OCMock (Configuring OCMock to work with Xcode 3.2.3 and higher)
- OCMock on iOS 4, (forum post)
Xcode Project Templates
We all need the support of others to do our best work. Find other like-minded developers that will provide encouragement and motivation through local user groups, conferences or meetups. I regularly attend Cocoa/iPhone developer meetups in Cincinnati, Ohio and Columbus, Ohio. If you are in the central or southwest Ohio area, come join me at either monthly meetup:
- Cincinnati CocoaDev, iOS and Mac development group, meets the 3rd Thursday of each month in Mason, Ohio
- Columbus iPhone Developers User Group (CIDUG), meets the 4th Tuesday of each month in Dublin, Ohio
Also, here is a little more information about me, Doug Sjoquist, and how I came to my current place in life. You should follow me on twitter and subscribe to my blog. Have a great day!

