How To Use Custom Classes With Core Data Without Fear

Filed in iDevBlogADay, iOS Development | Comments (0) |

If you are using CoreData in your iOS app, you have several options for your domain objects. Here is a short list of ways you could use Core Data objects in your app:

  1. Use generic NSManagedObject, no custom classes
  2. Create custom classes by hand
  3. Create a file template to use when creating custom classes
  4. Use an external tool to create custom classes
  5. Let Xcode generated custom classes, then modify them
  6. Add categories to Xcode generated custom classes

My general approach to development is to let Xcode do the tedious bits for me, so my approach to Core Data objects is #6. Let’s take a brief look at the other options first.

1. Simple Approach: No Custom Classes

Pick up almost any book that covers CoreData, and you will probably find the introductory example does not use custom classes at all. That is clearly the proper place to begin when teaching CoreData — you want to introduce topics in manageable chunks when someone is first learning a subject.

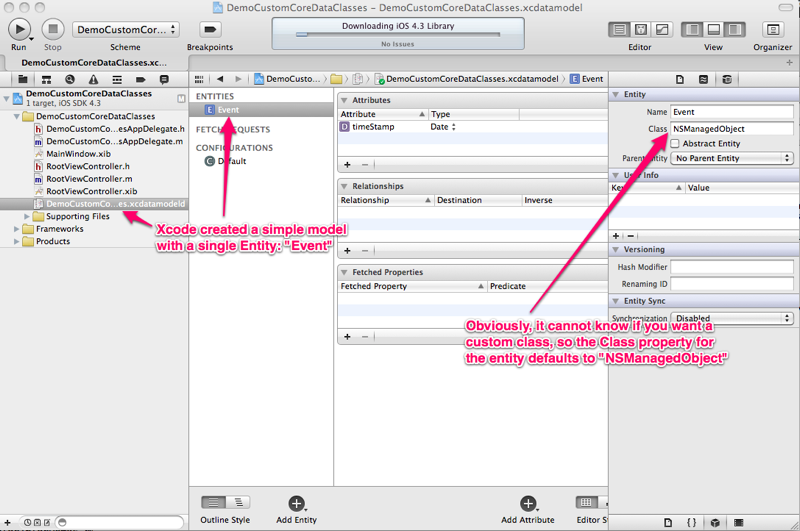
If you create a new project using Navigation-based Application template in Xcode, and select the “Use Core Data” checkbox, the initial project will create a simple model with one Entity, ‘Event’ which does not have a custom class.
DemoCustomCoreDataClasses 001

If your needs are simple, this method may be enough — it is certainly enough to play around with Core Data and learn what is going on. And for simple applications, you can manage the data just fine using the generic NSManagedObject instances . But if you need app-specific domain objects, then you will need to create custom classes for each of your domain objects.

Xcode lets you specify a custom class name on the property sheet for the entity, so let’s look at some ways to use that.

#2 Create custom classes by hand

I have never created a custom class by hand. There is no special magic to it, just some tedious work to make sure you correctly cover all the behavior needed. There can be value in doing things by hand once just to see what is involved in the process, but it is clearly not a useful long-term approach.

#3 Create a file template to use when creating custom classes

If you really have a desire to have non-standard, hand-crafted custom classes, then once you got it as you wanted, you could create a file template for it. I don’t recommend this any more than method #2, other options have the same flexibility with less work.

#4 Use an external tool to create custom classes

Some of the standard tools in many experienced Core Data developer’s toolbox have been Jonathan ‘Wolf’ Rentzsch’s tools: mogenerator and Xmo’d.

mogenerator is a program that builds two custom classes for each entity in a Core Data model: a machine version and a human version.

The machine version handles the basic behavior you need from a custom Core Data class (like Xcode’s generated classes). It is expected that the machine version will get overwritten every time the model changes, so you should not make any changes here — they will be lost.

The human version extends the machine version and is the class you modify for your own app specific behavior.

Xmo’d is a plugin for Xcode 3 that automatically detected changes to the model and regenerated classes as appropriate. Unfortunately, Apple changed something in AppleScript in Xcode 4 and broke something that the Xmo’d plugin needed.

mogenerator works just fine still from the command line, so is still a good choice. There are custom templates based on Jonathan’s work that you can use or modify as well, but you will need to get the project from github to see them.

#5 Let Xcode generated custom classes, then modify them

Xcode will generate custom classes for you based on the entity definition in the model. I like having Xcode generate classes instead of a third party tool so I do not have to worry (as much) about things breaking when new versions of Xcode are released, or missing things that might be part of an updated Core Data framework.

Just as with mogenerator, you can run regenerate these classes any time your model changes, but it will also completely overwrite the existing classes. So, if you choose to modify the generated classes directly, you are forced to do redo your custom work each time — not really a good choice.

Fortunately, there is a straightforward way to avoid this issue.

#6 Add categories to Xcode generated custom classes

Xcode generated custom classes + categories on those classes is a great combination, one that I have used that last several times I have needed Core Data support in an app. It has the benefits of mogenerator, plus the advantage of being a pure Xcode approach.

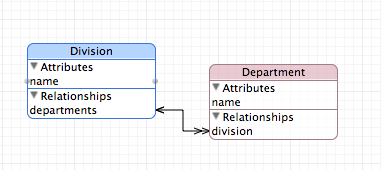
First, given this simple Core Data model with two entities, Division and Department:
DemoCustomCoreDataClasses 002

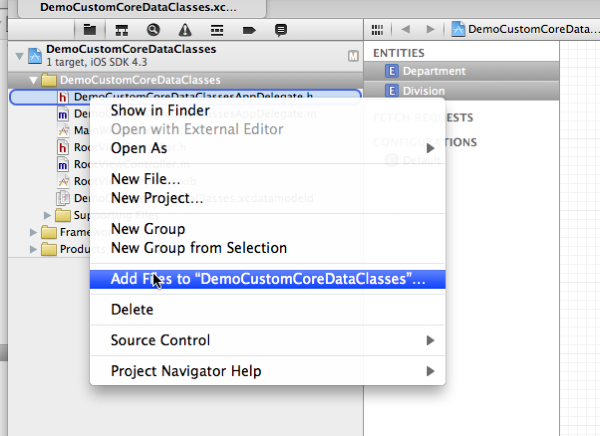
If we assign a Class to each of them, like ‘MyDivision’ and ‘MyDepartment’, then we can ask Xcode to generate the classes by selecting both entities in the Core Data modeler view, right click on the appropriate folder in the project view, and select ‘New File’ from the menu:
DemoCustomCoreDataClasses 003

Choose NSManagedObject subclass from the ‘Core Data’ group:
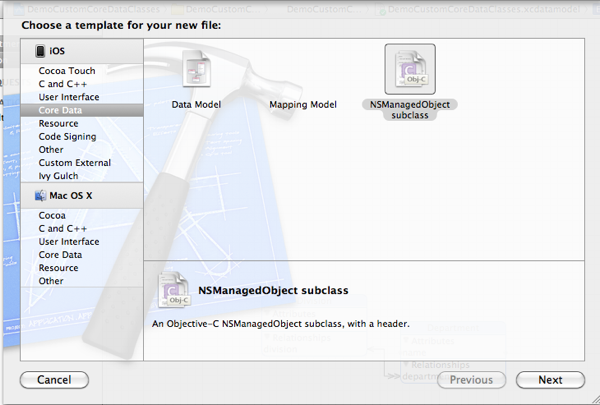
DemoCustomCoreDataClasses 004

And Xcode will generate classes like this:

//  MyDivision.h

#import <Foundation/Foundation.h>
#import <CoreData/CoreData.h>

@class MyDepartment;

@interface MyDivision : NSManagedObject {
@private
}
@property (nonatomic, retain) NSString * name;
@property (nonatomic, retain) NSSet* division;

@end
//  MyDivision.m

#import "MyDivision.h"
#import "MyDepartment.h"


@implementation MyDivision
@dynamic name;
@dynamic division;

- (void)addDivisionObject:(MyDepartment *)value {    
    NSSet *changedObjects = [[NSSet alloc] initWithObjects:&value count:1];
    [self willChangeValueForKey:@"division" withSetMutation:NSKeyValueUnionSetMutation usingObjects:changedObjects];
    [[self primitiveValueForKey:@"division"] addObject:value];
    [self didChangeValueForKey:@"division" withSetMutation:NSKeyValueUnionSetMutation usingObjects:changedObjects];
    [changedObjects release];
}

- (void)removeDivisionObject:(MyDepartment *)value {
    NSSet *changedObjects = [[NSSet alloc] initWithObjects:&value count:1];
    [self willChangeValueForKey:@"division" withSetMutation:NSKeyValueMinusSetMutation usingObjects:changedObjects];
    [[self primitiveValueForKey:@"division"] removeObject:value];
    [self didChangeValueForKey:@"division" withSetMutation:NSKeyValueMinusSetMutation usingObjects:changedObjects];
    [changedObjects release];
}

- (void)addDivision:(NSSet *)value {    
    [self willChangeValueForKey:@"division" withSetMutation:NSKeyValueUnionSetMutation usingObjects:value];
    [[self primitiveValueForKey:@"division"] unionSet:value];
    [self didChangeValueForKey:@"division" withSetMutation:NSKeyValueUnionSetMutation usingObjects:value];
}

- (void)removeDivision:(NSSet *)value {
    [self willChangeValueForKey:@"division" withSetMutation:NSKeyValueMinusSetMutation usingObjects:value];
    [[self primitiveValueForKey:@"division"] minusSet:value];
    [self didChangeValueForKey:@"division" withSetMutation:NSKeyValueMinusSetMutation usingObjects:value];
}


@end

We can now create some category classes to add our own custom behavior and expose the add and remove division methods that are part of the generated implementation class.

//  MyDivision+helper.h

#import <Foundation/Foundation.h>

@protocol MyDivisionMethods <NSObject>
@optional
- (void)addDivisionObject:(MyDepartment *)value;
- (void)removeDivisionObject:(MyDepartment *)value;
@end

@interface MyDivision(helper)<MyDivisionMethods>

@property (nonatomic,readonly) BOOL valid;

- (void) myCustomMethod;
- (BOOL) validate:(NSMutableArray *) errors;

@end
//  MyDivision+helper.m

#import "MyDivision.h"
#import "MyDivision+helper.h"

@implementation MyDivision (helper)

- (void) myCustomMethod {
// do something here
}

- (BOOL) valid {
    return [self validate:nil];
}

- (BOOL) validate:(NSMutableArray *) errors {
    BOOL result = YES;

// check object state and children for validity    
// add error messages to errors array when problems are found

    return result;
}

@end

As long as you put all your custom behavior in the MyDivision(helper) or MyDepartment(helper) categories, and not in the MyDivision or MyDepartment class, you can have Xcode recreate the MyDivision and MyDepartment classes without worry.

Remember, to make use of the methods implemented or exposed in your category, import both header files in the classes that need that behavior:

#import "MyDivision.h"
#import "MyDivision+helper.h"

...

Conclusion

There are many useful bits of Core Data advice out on the web, but this is definitely one area where a good book can help.

There are a number of books out there, many of them good, but since Core Data and Xcode keep changing, you want to find a fairly recent edition of one. For iOS apps, I recommend “Core Data for iOS” by Tim Isted and Tom Harrington.

I am leading a half-day session this September at 360iDev on using OCMock in your automated tests (you are doing automated testing, right?) You should come join us, 360iDev is always a great time for so many reasons.

Also, I am doing two sessions at a new conference, CocoaConf, in Columbus Ohio on August 12th & 13th. It is a new conference, so I can’t tell you about past performance, but it has a great set of featured speakers, and I fully expect it to be a great time. Check it out!

Have a great day!


This is post 7 of 10 on my second iDevBlogADay run.

We all need the support of others to do our best work. Find other like-minded developers that will provide encouragement and motivation through local user groups, conferences or meetups. A great collection of indie iOS developers have helped me stay on track through meetups, 360iDev, twitter, and iDevBlogADay.

I regularly attend Cocoa/iPhone developer meetups in Cincinnati, Ohio and Columbus, Ohio. If you are in the central or southwest Ohio area, come join me at either monthly meetup, or join us in Columbus for CocoaConf in August:

If you depend on iOS development for your livelihood, or would like to get to that point — you really need to attend a conference dedicated to helping you get better, and I can think of no better conference for that purpose than 360iDev — you should register today!. Much of what I am able to do professionally is due to the things I learned and the people I met there.

Finally, here is a little more information about me, Doug Sjoquist, and how I came to my current place in life. You should follow me on twitter and subscribe to my blog. Have a great day!

Don’t Nest Those UIViewControllers!

Filed in iDevBlogADay, iOS Development | Comments (0) |

Like many iOS developers, I came to iOS from a non-Mac development background. Switching platforms always requires some time to adjust to the different libraries and usage patterns of the new platform, and Cocoa is no exception. I really like it now, and am very comfortable working with it, but there were some things it took a little while for me to use properly.

Nasty, Nested UIViewControllers

UIViewControllers and related classes are straightforward and pretty clear in their purpose. Apple’s user guide gives a good overview and is worth reviewing from time to time. But I have to admit that early on, I was consistently misusing custom UIViewControllers by trying to nest one within the other.

Like many beginners, my approach was wrong, but I managed to make it “work” anyway. I would usually create a new custom UIViewController subclass that managed a view and hacked together working behavior through liberal use of viewDidLoad and other methods like that. Nothing I’m proud of, or that I want to share with you — but I know I’m not alone, so I don’t feel too bad about it.

In principle what I wanted was a reusable view with a corresponding controller just for that view, my mistake was in assuming that the controller had to be an instance of UIViewController. Apple is quite clear in their documentation that there should be a single UIViewController that manages the overall view. Even as I twisted multiple, nested UIViewControllers to do my will, I knew it was a bad idea, but early on I was not sure how to do it better.

Simple Answers Are Sometimes Hard To See

When your mind is following wrong assumptions and thought processes, the truth can be hard to see.

The answer was actually quite simple. I can do exactly what I want with just a simple class for the view’s controller. I can even use Interface Builder if I choose to design the view and configure outlets and actions.

Part of my early error was because I wanted the iOS runtime to somehow magically know about my views and send them the same set of viewDidLoad, viewWillAppear, and related messages that UIViewControllers receive when used properly. I realized that trying to twist multiple UIViewController instances into behaving like the magic existed was foolish, so I found a better way.

New Pattern For Reusable Subviews

My current pattern is a simple approach that is an amalgam of various methods I learned from others. I use a single UIViewController to manage the overall view, and replace portions of the subview hierarchy as needed with individual views that have their own controller, which I call a view manager to avoid confusion. (After all, naming things is purported to be one of the two truly hard things in computer science.)

I have a standard set of ViewManagers that I use across projects, which derive from the same AbstractViewManager class and include a few standard behaviors. Each ViewManager instance is owned by a “real” UIViewController instance, and to help ViewManagers participate more fully in life cycle and memory events of UIViewControllers, the owning UIViewController instance forwards messages to its ViewManager instances as appropriate.

The accompanying example project has a split view controller at the root, with a list of sample data to display in the master table view. The simple detail is handled by DetailViewController which owns an instance of two ViewManagers: WebViewManager and ImageViewManager.

When a row is selected, the master table view controller sets the ‘detailItem’ property of DetailViewController, which expects a dictionary of values. The setter method for the detail item looks like this:

- (void)setDetailItem:(id)newDetailItem {
    [detailItem_ autorelease];
    detailItem_ = [newDetailItem retain];

    if (self.popoverController != nil) {
        [self.popoverController dismissPopoverAnimated:YES];
    }        

    NSString *detailType = [detailItem_ valueForKey:@"type"];
    if ([detailType isEqualToString:@"image"]) {
        self.currentViewManager = self.imageViewManager;
        [self.imageViewManager loadImage:[detailItem_ valueForKey:@"name"]
                                   title:[detailItem_ valueForKey:@"title"]];
    } else if ([detailType isEqualToString:@"web"]) {
        self.currentViewManager = self.webViewManager;
        [self.webViewManager loadURL:[detailItem_ valueForKey:@"url"]
                               title:[detailItem_ valueForKey:@"title"]];
    } else {
        self.currentViewManager = nil;
    }

}

This will set the currentViewManager property to the appropriate ViewManager instance and configure its view appropriately.

The custom setter for currentViewManager sends the appropriate life cycle events to both the old and new ViewManager:

- (void) setCurrentViewManager:(AbstractViewManager *)currentViewManager {
    if (currentViewManager == currentViewManager_) {
        return;
    }

    AbstractViewManager *oldViewManager = [currentViewManager_ autorelease];
    NSArray *subviews = [self.contentView subviews];
    
    if (oldViewManager) {
        [oldViewManager viewWillDisappear:YES];
    }
    for (id subview in subviews) {
        [subview removeFromSuperview];
    }
    if (oldViewManager) {
        [oldViewManager viewDidDisappear:YES];
    }
    
    currentViewManager.view.frame = self.contentView.bounds;
    if (currentViewManager) {
        [currentViewManager viewWillAppear:YES];
    }
    
    [self.contentView addSubview:currentViewManager.view];
    currentViewManager_ = [currentViewManager retain];    
    
    if (currentViewManager_) {
        [currentViewManager_ viewDidAppear:YES];
    }
}

Each ViewManager instance is lazy loaded, and unloads itself when the property is reset like this:

- (WebViewManager *) webViewManager {
    if (webViewManager_ == nil) {
        webViewManager_ = [[WebViewManager alloc] initWithNibName:@"WebViewManager" bundle:nil options:nil];
        [webViewManager_ viewDidLoad];
    }
    return webViewManager_;
}

- (void) setWebViewManager:(WebViewManager *) webViewManager {
    if (webViewManager_ == webViewManager) {
        return;
    }
    
    [webViewManager_ viewDidUnload];
    [webViewManager_ autorelease];
    webViewManager_ = [webViewManager retain];
}

DetailViewController also forwards ‘didReceiveMemoryWarning:’, ‘viewDidUnload:’, and other messages to instantiated ViewManagers when needed.

Conclusion

The ImageViewManager and WebViewManager classes are just simple examples of what can be done, but they should point you in the right direction.

I hope this will help someone else dig themselves out the nested UIViewController rathole that I fell into on my iOS development journey. If this sounds useful to you, download the demo project and give it a try.

Have a great day!


This is post 6 of 10 on my second iDevBlogADay run.

We all need the support of others to do our best work. Find other like-minded developers that will provide encouragement and motivation through local user groups, conferences or meetups. A great collection of indie iOS developers have helped me stay on track through meetups, 360iDev, twitter, and iDevBlogADay.

I regularly attend Cocoa/iPhone developer meetups in Cincinnati, Ohio and Columbus, Ohio. If you are in the central or southwest Ohio area, come join me at either monthly meetup:

If you depend on iOS development for your livelihood, or would like to get to that point — you really need to attend a conference dedicated to helping you get better, and I can think of no better conference for that purpose than 360iDev — you should register today!. Much of what I am able to do professionally is due to the things I learned and the people I met there.

Finally, here is a little more information about me, Doug Sjoquist, and how I came to my current place in life. You should follow me on twitter and subscribe to my blog. Have a great day!

Top 10 Reasons You Should Do A Cocoa Coding Day

Filed in iDevBlogADay, iOS Development | Comments (0) |

Cincinnati Cocoa Dev Coding Day

Our local NSCoder style group, Cincinnati CocoaDev, meets once a month. Usually someone presents on a particular topic on a weekday evening, we spend some time talking around pizza — the usual stuff. This month, we decided to do an informal coding day on Saturday, June 25th at Cincinnati Coworks since one of our members is a part of the group there as well. We had no particular agenda in mind, other than coding together for several hours.

I had a good time and it was a nice break from my usual work (which I was tempted to work on while there!) In the spirit of honing your craft, here are the top 10 reasons you should participate in something like this locally. And, if one doesn’t exist locally for you, then these are the top 10 reasons you should organize one!

#10 — It beats a Saturday cleaning the garage.

#9 — You get to try a different cafe or restaurant for lunch.

#8 — You can discover new project or career opportunities that might be available.

#7 — Working all day from a new location gives you a different perspective on your own work situation.

#6 — Trying something completely different exercises different parts of your brain.

#5 — Doing something just for the fun of it reminds you why you got into development in the first place.

#4 — It can provide some immediate feedback on those app ideas floating around your brain.

#3 — You can learn something useful you didn’t know from someone else.

#2 — You can share something useful with others that they didn’t know.

#1 — It’s just cool to hang out with people who like to code like you do!


This is post 4 of 10 on my second iDevBlogADay run.

We all need the support of others to do our best work. Find other like-minded developers that will provide encouragement and motivation through local user groups, conferences or meetups. A great collection of indie iOS developers have helped me stay on track through meetups, 360iDev, twitter, and iDevBlogADay.

I regularly attend Cocoa/iPhone developer meetups in Cincinnati, Ohio and Columbus, Ohio. If you are in the central or southwest Ohio area, come join me at either monthly meetup:

If you depend on iOS development for your livelihood, or would like to get to that point — you really need to attend a conference dedicated to helping you get better, and I can think of no better conference for that purpose than 360iDev — you should register today!. Much of what I am able to do professionally is due to the things I learned and the people I met there.

Finally, here is a little more information about me, Doug Sjoquist, and how I came to my current place in life. You should follow me on twitter and subscribe to my blog. Have a great day!

Deliberate Practice: The Key To Improving

Filed in iDevBlogADay, iOS Development | Comments (0) |

A Software Craftsman’s Journey

Practice5I am better at the craft of software than I once was.

But, I am not as good a craftsman as I want to be.

The road from where I was, to where I am, to where I want to be has crossed small creeks, gentle valleys, and deep ravines. Some of the bridges were built by someone else, and I had little idea how they were made. I built some temporary, swinging rope bridges that were crossed only at great need. And, I have built some bridges and tunnels that will last a lifetime.

The risky crossings were designed in haste and sloppily constructed, often with weak materials.

The structures that last were designed carefully and built deliberately.

Preparing For Technical Challenges

Even when you have been diligent in your preparations, obstacles can appear that require your immediate attention and need a temporary solution or some outside help. But there are many challenges that can be anticipated — ones that you can prepare for.

How do you prepare yourself for coming technical challenges, do you:

  • Avoid the problem entirely by sticking to the techniques and tools you already know? “All I have is a hammer, so everything gets treated like a nail.”
  • Wait until the challenge is upon you and feverishly dig through the software component flea markets of the internet looking for anything that is “good enough”?
  • Give up and find a new line of work?
  • Spend time building your skills and adding to your developer toolbox?

If you want to grow as a developer and software craftsman, it will take effort. The best way to spend that effort is on “deliberate practice”.

Deliberate Practice

Practice1Have you ever seen a music teacher who can take someone with nothing but potential and help turn them into an outstanding musician? Have you ever had a coach who took a collection of moderately skilled individuals and built a team that performed above the level any of the individuals thought possible? Have you worked with a tutor who opened your eyes to what you were truly capable of doing?

Teachers and coaches who produce exceptional results probably have many things in common, but one in particular is the focus on deliberate practice. No effective little league baseball coach simply throws balls, gloves, and bats out on the field and tells his 10 year olds to “go practice”? It takes practice with a plan.

Practice3The same thing applies to developing software skills. You will get far better results if you take a deliberate, mindful approach to learning new skills. And just as any good teacher or coach continues to emphasize the fundamentals while building ever more complex skills, it is helpful to revisit and practice older skills in a methodical manner.

The purpose of this kind of practice is to engrain good habits and techniques so deeply that they become second-nature. This kind of ability only comes about through repeated, correct use of the techniques — facilitated by a mindful approach to skill development as free of distraction as possible.

Deliberate practice in software development means:

  • I have a specific skill in mind that I want to learn or improve,
  • I have a quality source of knowledge or instruction about that skill (classes, books, tutorials, etc.)
  • I seek good advice on how to approach the topic,
  • I have a designated time to work primarily on that skill,
  • I track my activity in some fashion so I can measure and review my progress,
  • I periodically get an objective assessment from someone who knows the subject,
  • I review my progress and adjust my plan accordingly.

Several Approaches

Practice4One example of deliberate practice is “software koans”, described in this article by Mario Aquino.

The most complete example I know of is the Ruby Koans project developed by Jim Weirich and Joe O’Brien.

There is also a fairly new project on github, Objective-C Koans, that looks promising as well.

Other good approaches include things like:

  • “Coder nights” where a group of developers get together to work on a particular task together,
  • On-line tutorials where you actually write the code yourself, and repeat the process multiple times to train your brain properly,
  • “Game Jams” where you specifically try out a new technique in the company of and help from those experienced in whatever technique you are learning,
  • Day or weekend long training sessions focused on a particular topic.

Whatever you do, I encourage you to take control of your development skills. Become the software craftsman you want to be.


This is post 3 of 10 on my second iDevBlogADay run.

We all need the support of others to do our best work. Find other like-minded developers that will provide encouragement and motivation through local user groups, conferences or meetups. A great collection of indie iOS developers have helped me stay on track through meetups, 360iDev, twitter, and iDevBlogADay.

I regularly attend Cocoa/iPhone developer meetups in Cincinnati, Ohio and Columbus, Ohio. If you are in the central or southwest Ohio area, come join me at either monthly meetup:

If you depend on iOS development for your livelihood, or would like to get to that point — you really need to attend a conference dedicated to helping you get better, and I can think of no better conference for that purpose than 360iDev — you should register today!. Much of what I am able to do professionally is due to the things I learned and the people I met there.

Finally, here is a little more information about me, Doug Sjoquist, and how I came to my current place in life. You should follow me on twitter and subscribe to my blog. Have a great day!

Real Life iOS project using TDD Techniques

Filed in iDevBlogADay, iOS Development | Comments (0) |

iOS + TDD = Winning Combination

I just finished a short-term iOS project where I used TDD (Test Driven Development) techniques to good advantage. I know I ended up with a cleaner design and better code than I would have otherwise.

I am not a TDD expert, nor am I a TDD purist, but I wanted to share my experience and lessons learned while it was fresh. Hopefully this will encourage other developers to add more testing to their development diet. Also, while this is not a how-to post, I did include a few links at the end of this post.1

The Project

My task was to develop a simple template based, dynamic data entry module to be used in a larger project with a very near-term delivery date. The overall client requirement for the application was to download entry form templates from a server to an iPad, where their customer would fill in a form similar to existing paper forms. Once completed, the customer could submit the results.

The high level requirements for my module were:

  • Parse a simple text-based template file,
  • Produce a dynamic form with static text and labeled text fields,
  • Properly layout the form during rotation or resizing events,
  • Provide simple methods to manage the field values on the form.

Roughly, my time looked like this:

  • 10% — Up-front design and discussions with other developers
  • 20% — Testing and development of the parser
  • 15% — Testing and development of the form builder
  • 30% — Testing and development of the layout engine
  • 15% — Building a demo app to show how the module works on a device
  • 10% — Testing and implementing modifications

Because of the tight deadline, we designed a simple format for the template that allowed for headings, subheadings, and paragraphs of text with embedded text fields of varying lengths. Here is how things turned out.

Sample Template Text

#Customer Visit Report#

##Arrival##

The customer, [[CUSTOMER_NAME|10|Customer name]], entered [[STORE_NAME|10|Store]] 
at [[ARRIVAL_TIME|5|Time]] on [[ARRIVAL_DATE|5|Date]]
to [[VISIT_PURPOSE|10|Purpose]].

##Departure##

The customer left through the [[EXIT_LOCATION|5|Exit]]
at approximately [[DEPARTURE_TIME|5|Time]].

Demo App Editor

RealLifeTDD 1

Demo App Form

RealLifeTDD 6

The field values for the template can be set before or during an edit session, and it can be told to generate a dictionary of field names and values at any point in the process as well.

The Process

At it’s core, the TDD process is:

  1. Decide what behavior to implement next,
  2. Write a failing unit test that exercises that behavior,
  3. Write the smallest amount of code it takes to make the test pass,
  4. Refactor the system as needed,
  5. Repeat.

At each step during this process, the entire suite of tests is run often to make sure no existing behavior is inadvertently broken.

My simplistic understanding of pure TDD was you should write unit tests even before the class or method that will implement the behavior exists. However, my development toolset of Xcode, GHUnit, and OCMock made that scenario pretty awkward, which slowed me down. I needed something with a better flow, so in my process, I:

  1. Decided what behavior to implement next,
  2. Added a appropriate unit test by:
    • Writing a failing unit test that exercised that behavior,
    • When necessary, creating a minimal class or adding an empty method so the target under test would build,
    • Ensuring the test target based on GHUnit/OCMock would build,
    • Ensuring the tests ran to completion in the simulator,
    • Ensuring the older tests still passed,
    • Ensuring the new test failed.

    If any of that did not happen, I made changes to the tests or module until it did.

  3. Wrote the smallest amount of code it took to make the new test pass,
  4. Refactored the system as needed by:
    • Extracting duplicate code in the tests or module into common methods,
    • Removing extraneous parameters or methods,
    • Simplifying the design as new insight is gained,

    During which I ran the entire test suite often to make sure nothing was inadvertently broken.

  5. Occasionally ran the demo app to check the visual behavior,
  6. Repeated until finished.

I am now accustomed to this style in Xcode, so each iteration went very quickly.

Limitations of Current Toolset

I did not find any limitations that would make me second-guess my decision to build this module using TDD, but there were some minor hassles.

I really like OCMock’s implementation of mock objects for Objective-C, but I had to make small changes to some module code to be able to use it. For instance, in one set of methods I would have preferred to use a primitive variable for the argument, but I needed to use a NSNumber instead because of the nature of the test I wanted to write. Even so, there were many more cases where primitive method arguments worked just fine in my tests, so it really was just a minor annoyance.

It is pretty straightforward to run a single test in GHUnit, but once I started adding more and more tests, it would have been nice to have a quicker way to do that. This project was fairly small, but I can envision some issues with a larger project. My core library ended up with 9 class files, and the test target had 9 class files with 47 unique tests. I definitely would want better ways to run individual tests and subsets of tests as the number of tests grows. At some point in the future, I would like to modify GHUnit to make this easier.

GHUnit does a decent job of sorting out the log output for each test so you can find the root cause of failures, but I find the standard Xcode/NSLog output too cluttered. It is important to form the habit of running tests very frequently, so anything that speeds up each loop is a good thing. A combination of easier control of which tests I want to run and finer control of the log output would smooth out the whole process.

While not a limitation of TDD or testing tools in particular, I wish the refactoring in Xcode 4 was better. I am convinced that if Xcode had better automated support for common refactorings such as extract method it could have reduced my development time by 5-10%. I know some Objective-C developers may not like Java, but the refactoring support in JetBrain’s IntelliJ is world-class. I have high hopes for their AppCode tool.2 Perhaps it will be popular enough to have an influence on future Xcode versions.

Lessons Learned

I really enjoyed using these techniques and I plan on following this pattern as much as possible in future iOS projects.

What I learned:

  • Testing non interface elements was a no-brainer, doing that is the minimum I should do for every project.
  • Testing the methods that arranged view layouts worked better than I expected.
  • GHUnit fits my development and testing style better than OCUnit.
  • Using OCMock to manage mock objects made writing tests easier, so it greatly increased the number of tests I was able and willing to write.
  • I want to modify GHUnit to support better organization and management of individual tests.
  • I need to spend more time with OCMock to discover if my workaround was really necessary.
  • I need to investigate Xcode logging techniques.
  • I need to give the latest version of JetBrains AppCode a serious try.

If you are not already doing so, I highly recommend adding automated testing to your development process. I also encourage you to investigate TDD to see if some of it’s techniques can help you build better code more reliably.

Have a great day!


This is post 2 of 10 on my second iDevBlogADay run.

We all need the support of others to do our best work. Find other like-minded developers that will provide encouragement and motivation through local user groups, conferences or meetups. A great collection of indie iOS developers have helped me stay on track through meetups, 360iDev, twitter, and iDevBlogADay.

I regularly attend Cocoa/iPhone developer meetups in Cincinnati, Ohio and Columbus, Ohio. If you are in the central or southwest Ohio area, come join me at either monthly meetup:

If you depend on iOS development for your livelihood, or would like to get to that point — you really need to attend a conference dedicated to helping you get better, and I can think of no better conference for that purpose than 360iDev — you should register today!. Much of what I am able to do professionally is due to the things I learned and the people I met there.

Finally, here is a little more information about me, Doug Sjoquist, and how I came to my current place in life. You should follow me on twitter and subscribe to my blog. Have a great day!


1. GHUnit, Xcode, and TDD links

  • I wrote a blog post on setting up Xcode 3 to use GHUnit and OCMock,
  • I am working on a series of tutorials on TDD and iOS using Xcode 4 for Ray Wenderlich’s tutorial site, http://www.raywenderlich.com, the first of which should be available very soon,
  • I am making a presentation on OCMock at 360iDev in Denver in September.

2. JetBrains AppCode — an alternative to Xcode.

Are You Being Energized or Drained?

Filed in iDevBlogADay, Miscellaneous | Comments (0) |

Things That Energize Me

Eric

EricYesterday I was in the basement talking with one of my sons. I heard laughter upstairs and went to see what was up — at the top of the stairs I found my grandson quickly crawling towards me. He had heard my voice and decided being with grandpa sounded like a pretty cool thing, and took off like a shot to come find me.

How great is that!

Often when he is around, a short work break turns into an extended session crawling around on the floor until my knees hurt. When that happens, I always return to my basement lair refreshed.

Making Physical Things

It has been a little while since I have done any significant woodworking, but I do have a decent set of tools and supplies in the garage. I love starting with nothing more than a vague idea and transforming raw pieces of wood into something with my own two hands (and some power tools!).

Creating physical things that never existed before is very cool, and seeing the finished product sitting on the workbench is satisfying.

Wilderness

GlacierNPI love spending time with my family, and some of my favorite times are our trips to the mountains, woods, or canyons. Being someplace where none of my technology works frees me in a unique way. Even a short visit to the wilderness can recharge a part of my mind and soul that I didn’t even realize were hurting.
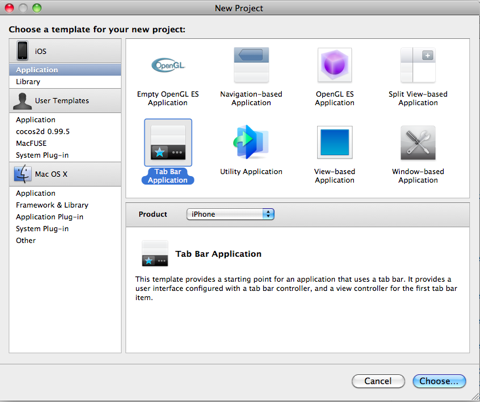
A hike in the canyons of the southwest, the great woods of the north, or one of our great National Parks in the mountains inspires me in a way nothing else can.

Helping People

When someone I have taught demonstrates by their work or life that they “got it”, that gives me a good feeling. But, when they surpass anything I taught or helped with — that is really exciting.

When someone like that excels, their success spills over and puts gas in my tank.

Writing Useful Software

As much as I like seeing something physical take shape, crafting something out of nothing but thought is a uniquely enjoyable experience. When the pieces come together and fit just like I want; when I can look at what I have written and honestly say to myself, that turned out pretty well; and when others find what I have finished to be good — I am pleased, and that pleasure provides energy for the next round.

Things That Drain Me

Breaking Commitments

One of the requirements of being a responsible adult is making commitments and keeping them. When I can see no way to keep a commitment I made because of my poor planning or lack of understanding of what I was doing — I pile up stress points like crazy. If I have to go back to someone and explain that I can see no way to keep the commitment I willingly made earlier, it is a serious emotional drain and can turn into a downward spiral if I am not careful.

Making a Mistake That Hurts Someone Else

Mistakes happen. We all know that. If I mess up on something that primarily hurts me, I kick myself for a minute then get my head on straight and figure out how to correct it and move on. I really don’t waste energy on the “if only” stuff any more. But, if my mistake causes someone else extra work or pain, I cringe and struggle with figuring out how to make amends.

Repeatedly Failing To Reach A Goal

If I set a goal, whether formal or informal, and don’t reach it — I am usually able to rationally analyze what went wrong and decide how to proceed. But, if there is a long term goal that I seem to be getting no closer to, or repeat the “set goal, fail” cycle for the same goal too many times, it gets very discouraging.

Beating Discouragement

We all could make lists like these. Some of the items will change, but the pattern is part of being human. One of the dangers of discouragement is that it starts a negative feedback loop that can ruin me emotionally if left unchecked.

To be discouraged is “to be deprived of courage or confidence : be disheartened”. When my courage or confidence is low or non-existent, it can be very hard to break out of that cycle. Here are some things I can do to break discouragement’s nasty grip.

Separate The Objective Reality From Subjective Feelings

Emotions are a vital part of being human, and it does not help if I pretend they don’t exist or that they don’t matter. Unfortunately, emotions can be misleading or just plain wrong, and often lag far behind objective reality. I need to find a way to sort out what is real.

I need to work backwards from my feelings to the reality. I do something like the “Five Whys” on my emotions to help determine the root causes. Once I have identified the root causes of my discouragement I am in a better position to address them.

For root causes that are outside my control, I have to ask myself if I can really afford to let events like that control my life so deeply. At this point, I need to force myself to change my goals or expectations. If I am unwilling to make that change, I need to realize I am facing a downward spiral with no escape.

For root causes over which I have some control, I have to ask myself which is more important: the status quo those causes represent or my goal. It may be difficult to decide, and my end decision may be a hybrid, but once again, something needs to change or nothing will be solved.

Enlist The Help Of Objective Loved Ones And Friends

If I am having trouble sorting out the truth about my discouragement, enlisting an objective loved one or friend makes a big difference. Even the geekiest, most introverted people need others, and I am no different. It can be painful to ask for this kind of help, and I need to use discretion, but it may be the only way for me to see what is true and what is false.

Choose To Do Things That Energize You

I need to find those things that energize me. I cannot expect to remove destructive emotions without finding things to take their place. When I have a choice, I need to choose activities, relationships, and projects that will be encourage me to keep trying.

I need to find ways to take incremental steps towards my goals. When I see progress on a small scale, that enables me to envision success on a grander scale.

Be Decisive

It is a myth that I can have it all. I need to make choices about what is important to me, what I want, what I should do, and what I cannot do.

One aspect of leadership that applies to all responsible adults is that decisions must be made with incomplete information. I will never have all the information I want before I have to make a decision, and if I keep waiting for it, I will end up in “analysis paralysis”.

So.

  • Make a decision.
  • Be willing to live with the consequences of that decision.
  • When necessary, make changes.

After all, that is what it means to be a grown up.


This marks the beginning of my second run on iDevBlogADay. Once again, my thanks go out to all the participants, readers, but especially to Miguel. Thanks Miguel!

We all need the support of others to do our best work. Find other like-minded developers that will provide encouragement and motivation through local user groups, conferences or meetups. A great collection of indie iOS developers have helped me stay on track through meetups, 360iDev, twitter, and iDevBlogADay.

I regularly attend Cocoa/iPhone developer meetups in Cincinnati, Ohio and Columbus, Ohio. If you are in the central or southwest Ohio area, come join me at either monthly meetup:

If you depend on iOS development for your livelihood, or would like to get to that point — you really need to attend a conference dedicated to helping you get better, and I can think of no better conference for that purpose than 360iDev — you should register today!. Much of what I am able to do professionally is due to the things I learned and the people I met there.

Finally, here is a little more information about me, Doug Sjoquist, and how I came to my current place in life. You should follow me on twitter and subscribe to my blog. Have a great day!

Sample Xcode 4 project with embedded GHUnit and OCMock frameworks

Filed in iOS Development, Miscellaneous | Comments (0) |

My previous post described building an Xcode project template with GHUnit and OCMock support built-in.

Unfortunately, the project template structure for Xcode 4 is significantly different, and even though I am working almost exclusively in Xcode 4 now, I have not taken the time to create a new version of the template.

So for now, I went a little old school and created and empty base project and then just copy the directory and rename things to start a new project.

This zip file is roughly the same contents as what the project template creates in Xcode 3, and I just verified that I can open it up cleanly, build, and run both test targets in Xcode 4. I hope it helps.

https://sunetos.com/code/EmptyXcode4GHUnitOCMock.zip

Creating an Xcode project template with GHUnit and OCMock

Filed in iOS Development | Comments Off on Creating an Xcode project template with GHUnit and OCMock |

I use GHUnit and OCMock in my app development, but each time I set up a new project in the past, it felt klunky and error prone. I either copied an old one to start and renamed and deleted things, or I created a new one and dragged chunks from old projects into it. I grew weary enough of this process that I decided it was time to create an Xcode project template with my typical setup.

I recently created an Xcode project template to do all this, and I decided to write a step-by-step description to help others do something similar. It is a simpler project than my template, but covers all the required steps. It might be useful to you as-is, or perhaps it just gives you the one missing piece in your battles with GHUnit, OCMock, or project templates.

These instructions are based on:

and will cover these steps:

  1. Create a base application project
  2. Add a GHUnit based application test target
  3. Add OCMock to the application test target
  4. Create an Xcode project template from the project

General comments

I highly recommend creating a local source control project to save your work as you progress. Commit your changes often enough to make things easier on yourself. My practice is to do one thing at a time, get it working, and commit to my local .git repository. Every so often, usually after a major subtask is complete, I will also push my changes to a remote git repository.

These instructions will create a project structure with all files stored in the actual project directory, including the GHUnit and OCMock frameworks. It is better for your template to embed its dependencies rather than depend on external references.

These instructions assume everything we create or download will be in the directory ~/xcpt, but feel free to put them wherever you like.

After each step in the process, you should do a clean, build, and run for each target to validate the configuration and dependencies, and make sure your VCS includes all files and you have committed your changes.

I create projects and templates with more structure and configuration options than we will cover here. In order to focus on the core issues, I will be creating a simpler project structure than I normally use. I would suggest you create the simple project and template here first to ensure the steps work for you. Then create a customized version that matches how you normally set up your projects.

We will use the name TemplateBase for our project and derive several targets and file names from it. You can choose whatever name you wish, but for ease of editing the final project and turning it into a template, be consistent in your naming.

There are many more options for GHUnit, OCMock, and project templates, but they are outside the scope of these instructions. For more information, see the Other Links at the end of this post.

1. Create a base application project

xcptStep1a.pngThese instructions start with the Tab Bar Application template, but you should be able to build your template based on any of the standard application templates.

This step is straightforward but provides a baseline on which we can build our project.

  • Create a new subdirectory xcpt in your home directory
  • Open up Xcode, and create a new project based on the Tab Bar Application template
  • Save the project as TemplateBase in ~/xcpt
  • Make sure the project builds and runs in the simulator without error

If you like positive reinforcement, congratulations, step 1 is complete! If not, let’s move on anyway.

2. Add a GHUnit based application test target

xcptStep2a.pngFirst, we need to add a test target to our project. GHUnit runs as as a standard application target, so create a new application target named TemplateBaseTests.
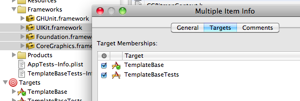
xcptStep2b.pngAdd the existing frameworks in our project to this target by selecting them as a group, right-clicking them, and checking TemplateBaseTests in the Target Memberships list.
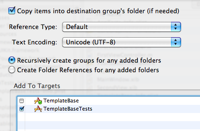
Next, we need a copy of GHUnit. Download the latest version, 0.4.27, from github, and unzip it into ~/xcpt.

xcptStep2c.pngOpen the ~/xcpt folder in Finder and drag the GHUnit.framework directory to the Frameworks group in your project. Make sure you:

  • Check “Copy items into destination group’s folder (if needed)”
  • Uncheck TemplateBase in the Add to Targets window,
  • Check TemplateBaseTests in the Add to Targets window

xcptStep2d.pngNow create a new group called “Test Classes”. Edit the info for the group, and under the Target tab, assign this group to TemplateBaseTests.
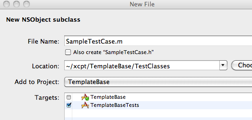
xcptStep2e.pngCreate a new class named SampleTestCase in the Test Classes group. We do not need a header file for our unit test classes, so uncheck “Also create SampleTestCase.h”.

Replace the entire contents of the file with the following code:

#import &lt;GHUnit/GHUnit.h&gt;

@interface SampleLibTest : GHTestCase { }
@end

@implementation SampleLibTest

- (void)testSimplePass {
	// Another test
}

- (void)testSimpleFail {
	GHAssertTrue(NO, nil);
}

@end

xcptStep2f.pngOpen up the info dialog for the TemplateBaseTests target, and select the Build tab. Select “All configurations”, then find the “Other Linker Flags” setting and add “-all_load” and “-ObjC”.
Now select TemplateBaseTests-Info.plist and clear the value for the “Main nib file base name” property.

Our last step is to download the file GHUnitIOSTestMain.m and add it to our Test Classes group. Make sure you actually copy the file into the folder when you add it, we need this file to be a part of our directory structure for use in the template.

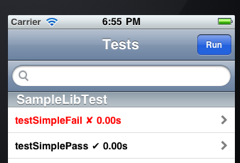
xcptStep2g.pngWe are now ready to run our application tests. Change the active target to TemplateBaseTests, switch to the Simulator, and run the target. If everything is configured properly, your test application should start. Click the Run button, and you should see something similar to this:

Once you have the TemplateBaseTests target running correctly, double check your dependencies by doing a clean, build, and run on the TemplateBaseTests target.

3. Add OCMock to the application test target

Now that our appplication test target works, we want to add support for OCMock. Something changed in Xcode since 3.2.3 and older methods of integrating OCMock appear to have quit working. I have talked with developers who struggled with getting it working and gave up, but I have not had any problems with the method I use.

The method that works consistently for me is to add the OCMock.framework and the libOCMock.a to our test target, with one caveat: the library file that is part of the normal OCMock distribution does not work with iPhone projects, we need the library file that is part of the iPhone example project.

xcptStep3a.pngFirst, download the standard installation file, ocmock-1.70.dmg and open it in Finder. Drag the OCMock.framework from the Release folder to the Frameworks group in your project. As with the GHUnit framework make sure you:
  • Check “Copy items into destination group’s folder (if needed)”
  • Uncheck TemplateBase in the Add to Targets window,
  • Check TemplateBaseTests in the Add to Targets window

The library file in the dmg file will not work with your iPhone project, so we need the one from the iPhone example project. Download the file libOCMock.a from the example project page, open it in Finder, and drag it to the Frameworks group in your project. As with the frameworks, make sure to copy the file, and include it in the TemplateBaseTests target.

Now we need to add some test cases that use OCMock to our SampleTestCase. Replace the entire contents of the SampleTestCase.m with the following code:

#import &lt;GHUnit/GHUnit.h&gt;
#import &lt;OCMock/OCMock.h&gt;

@interface SampleLibTest : GHTestCase { }
@end

@implementation SampleLibTest

- (void)testSimplePass {
    // Another test
}

- (void)testSimpleFail {
    GHAssertTrue(NO, nil);
}

// simple test to ensure building, linking, and running test case works in the project
- (void)testOCMockPass {
    id mock = [OCMockObject mockForClass:NSString.class];
    [[[mock stub] andReturn:@&quot;mocktest&quot;] lowercaseString];

    NSString *returnValue = [mock lowercaseString];
    GHAssertEqualObjects(@&quot;mocktest&quot;, returnValue, @&quot;Should have returned the expected string.&quot;);
}

- (void)testOCMockFail {
    id mock = [OCMockObject mockForClass:NSString.class];
    [[[mock stub] andReturn:@&quot;mocktest&quot;] lowercaseString];

    NSString *returnValue = [mock lowercaseString];
    GHAssertEqualObjects(@&quot;thisIsTheWrongValueToCheck&quot;, returnValue, @&quot;Should have returned the expected string.&quot;);
}

@end

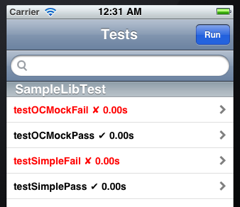
xcptStep3b.pngWe are now ready to run our application tests. Change the active target to TemplateBaseTests, switch to the Simulator, and run the target. If everything is configured properly, your test application should start. Click the Run button, and you should see something similar to this:
Once you have the TemplateBaseTests target running correctly, double check your dependencies by doing a clean, build, and run on the TemplateBaseTests target.

4. Create an Xcode project template from the project

Creating a basic Xcode project template from your project requires some simple steps:

  1. Copying the project’s directory structure to the right place
  2. Renaming some files
  3. Changing references to your base project name in all the files in the project

Xcode looks for project templates in multiple locations, but the best place to put your new template is in the directory:

~/Library/Application Support/Developer/Shared/Xcode/Project Templates/Application

By placing your template here, future Xcode upgrades should leave it alone.

If this directory does not exist, go ahead and create it. Copy your project directory “~/xcpt/TemplateBase” into this directory. The name of the directory is the name that Xcode will use when it displays it under “User Templates”, so you can rename the top level directory name to whatever you want displayed.

One minor cleanup item at this point is to remove the files “username.pbxuser” and “username.perspective3” from the TemplateBase.xcodeproj directory. You only need the “project.pbxproj” file.

At this point if you open Xcode and select New Project from the menu, your template will display in the list, and will even be usable. But, we do not want our new project to use file names like “TemplateBaseAppDelegate”, we want the file names to match whatever our new project name is, so we need to use the special file naming and tagging conventions that Apple uses in its templates.

There is a good post on CocoaDev that lists the available tags. When creating a new project, Xcode will do the appropriate text substitution in file names and contents based on these tags. Apple’s current style is to use three underscores “___” as delimiters. The CocoaDev post uses the older style of delimiters («tagname»), but the names are still the same.

For our example, we will only use two tags: “___PROJECTNAME___” and “___PROJECTNAMEASIDENTIFIER___”.

We cannot use Xcode to edit names since we will be changing contents of the internal structure of an Xcode project. Use command line tools or whatever editor you have on hand. I like to use TextMate for this sort of thing since it allows me to open an entire directory as a group and make changes en masse.

Before we edit any file contents, we need to rename the files in our project template directory to use the appropriate tag name. In the ‘~/Library/Application Support/Developer/Shared/Xcode/Project Templates/Application/TemplateBase’ directory, rename these files:

Existing file New name
Classes/TemplateBaseAppDelegate.h Classes/___PROJECTNAMEASIDENTIFIER___AppDelegate.h
Classes/TemplateBaseAppDelegate.m Classes/___PROJECTNAMEASIDENTIFIER___AppDelegate.m
TemplateBase-Info.plist ___PROJECTNAMEASIDENTIFIER___-Info.plist
TemplateBase.xcodeproj ___PROJECTNAME___.xcodeproj
TemplateBase_Prefix.pch ___PROJECTNAMEASIDENTIFIER____Prefix.pch
TemplateBaseTests-Info.plist ___PROJECTNAMEASIDENTIFIER___Tests-Info.plist

At this point, if we created a project from this template, it would be broken — our filenames would be inconsistent with the internal references to those files, so we now need to edit all the references to use tag names as well. These files all contain the string “TemplateBase” and need to be edited.

  • Classes/___PROJECTNAMEASIDENTIFIER___AppDelegate.h
  • Classes/___PROJECTNAMEASIDENTIFIER___AppDelegate.m
  • Classes/FirstViewController.h
  • Classes/FirstViewController.m
  • FirstView.xib
  • MainWindow.xib
  • SecondView.xib
  • ___PROJECTNAME___.xcodeproj/project.pbxproj
  • ___PROJECTNAMEASIDENTIFIER____Prefix.pch
  • main.m

xcptStep4b.pngI will use TextMate in my instructions, but any editor should do. Just make sure you don’t miss a file.
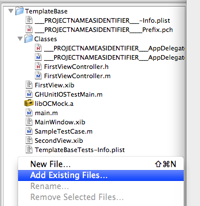
Open the top level directory for your template using TextMate. Evidently TextMate recognizes the framework and Xcode project file directories, so it does not add them by default. We need to add just the Xcode project file directory to our list by opening it up specifically inside this TextMate session. Right click on the empty space below the existing file names, select “Add Existing Files”, then select the directory name “___PROJECTNAME___.xcodeproj”.

Now do a global find and replace, changing all references of “TemplateBase” to “___PROJECTNAMEASIDENTIFIER___”. Save your changes, and your project template should be complete.

You should now be able to create a new project based on this template. Run both the application and test targets in the simulator on your newly created project to verify that.

Other Links

I have kept the instructions pretty minimal in this example, but there are obviously a lot of additional things you can do. Here are several links I found useful while working with GHUnit, OCMock, and Xcode project templates. If you had any problems with my example, perhaps one of these links will help you better!

Zip files of Project Templates

GHUnit

OCMock

Xcode Project Templates


We all need the support of others to do our best work. Find other like-minded developers that will provide encouragement and motivation through local user groups, conferences or meetups. I regularly attend Cocoa/iPhone developer meetups in Cincinnati, Ohio and Columbus, Ohio. If you are in the central or southwest Ohio area, come join me at either monthly meetup:

Also, here is a little more information about me, Doug Sjoquist, and how I came to my current place in life. You should follow me on twitter and subscribe to my blog. Have a great day!

Old Year, New Year, Old Stuff, New Stuff!

Filed in iDevBlogADay, Miscellaneous | Comments Off on Old Year, New Year, Old Stuff, New Stuff! |

Old Year, Old Stuff

I have been an independent developer for over twelve years, using a variety of tools, platforms, and languages. I really love being on my own, even through the slow periods when I wondered if I would find any new projects to work!

Breaking away from corporate life might not be for everyone, but if you are thinking about it, I encourage you to keep working towards that goal. Being independent while my kids were growing allowed us to do many things as a family that I would not otherwise have been able to do. It also put me in a position to work on some very cool projects for different clients over the years.

Old Year, New Stuff

Twelve months ago, I set a goal of having close to half my work be iOS based by the end of the year. I did not quite reach that goal, but I can definitely see it happening in the near future.

I have really matured in my iOS development by hanging out with very smart and sharing people at 360iDev conferences, local user groups and meetups, and through twitter. Thanks to all who taught, wrote, or otherwise shared great stuff!

New Year, Old Stuff

I have gone through many changes in life, both personally and professionally, but very few have been abrupt ones. I still expect to continue on in some fashion with projects I have been working this past year. As some major projects from the past year wind down this year, it will be interesting to see what comes next.

New Year, New Stuff

This coming year will be one of those gradual changes as I move into more and more mobile development, both iOS and Android, over the coming months. I anticipate being very busy for the first few months of the year, and then seeing what happens.

iDevBlogADay.com

Today’s post marks four complete months for my participation in iDevBlogADay, and with the new work I will be involved with over the next few months, this seems an appropriate time to hand over my coveted Sunday slot to the next victim. I’ve really enjoyed being a part of iDevBlogADay.com — it has been the primary support technique to get me writing regularly again, and for that I am very thankful.

Participating has taught or reminded me of several things:

  • Just like software, good writing is work;
  • Writing usually takes longer than I think and rarely turns out exactly like I planned;
  • There is nothing like a deadline to motivate me to action;
  • Writing about what I am learning helps me understand it better;
  • The developer community in general, and the iOS developer community in particular is great!

Thanks Miguel!

Miguel, thanks so much for the work you put into setting up and maintaining iDevBlogADay, I appreciate it very much. For those who have read, commented on, and retweeted my posts — thank you, I hope you found some useful nuggets along the way.

I still plan on posting twice a month, though not on Sunday. You should subscribe to my blog and hold me accountable to this.

Please follow me on twitter if you are interested in what comes of all this new stuff!

Merry Christmas and Happy New Year!

Animating Multiple Virtual Pages Using a NIB-based View

Filed in iDevBlogADay, iOS Development | Comments Off on Animating Multiple Virtual Pages Using a NIB-based View |

Today’s post is a simplified version of some work I’m doing for a client.

For the client app, I need to browse a set of data using a NIB-based view, but do so by swiping left and right in the context of a parent view — a similar effect as Apple’s weather utility app. I didn’t explore how Apple actually does it, but the method I am using is pretty straightforward.

Overview

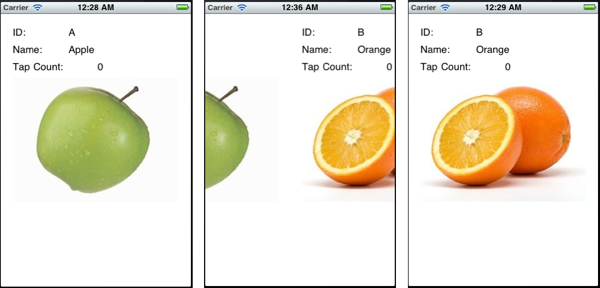
Demo2010Dec19_pic1.pngThis simple app displays a view for a single item at a time from an ordered list of simple domain objects. A UISwipeGestureRecognizer detects swipe events which are used to animate items on and off the parent view.

The previous view is off screen to the left, and the next view is off screen to the right. Both of these are preloaded so that when a swipe event is recognized, there is no delay while loading data for the item to be animated onto the parent view. The app cycles through three instances of the same NIB-based view controller as the user swipes.

For instance, given a list of 7 items, the app starts in this state:

  • The center view displays item A;
  • The view off screen to the right is preloaded with item B;
  • The view off screen to the left is preloaded with the last item, item G;

In this state, when a left swipe event is recognized, I want it to be interpreted as “move the currently displayed item (A) to the left and show me the next item (B)”. What happens is this:

  • The position of the center view is animated to the left off screen position;
  • The position of the right view is animated to the center on screen position;
  • The old center view becomes the new left view;
  • The old right view becomes the new center view;
  • Since the old left view is “pushed” farther to the left, it becomes the new right view;
  • The new right view is loaded with the appropriate data from the list.

A mirrored set of events happens on a right swipe event. (The app treats the list circularly, so there is no right or left edge of items.) The app also includes a tap recognizer which is used to update the tap count for each item to demonstrate how you can maintain state as views are cycled.

Handling Gestures

Each instance of SampleViewController has three gesture recognizers, swipe left, swipe right, and tap. Each also retains a reference to it’s currently displayed item when it is loaded.

The behavior for tapping is simple. When a tap is recognized on a view, the tap count for that view’s item is updated. Nothing needs to happen outside the current view and item.

The behavior for swiping is slightly more involved. Since a swipe is supposed to initiate animating the current view off the screen and a new view into the center, it would be messy for the current view to handle the animation. The best solution is to have the parent view handle the animation, since it already owns all the items and views necessary.

The cleanest way to accomplish this is by creating a simple protocol for delegating the behavior. SampleViewController.h includes the protocol definition, and adds an ivar for the delegate itself.

SampleViewController.h

#import &lt;UIKit/UIKit.h&gt;
#import &quot;SampleData.h&quot;

@class SampleViewController;

@protocol SampleViewControllerDelegate
- (void) handleSwipeLeftFrom:(SampleViewController *) source;
- (void) handleSwipeRightFrom:(SampleViewController *) source;
@end

@interface SampleViewController : UIViewController {
    UILabel *sampleIdLabel;
    UILabel *nameLabel;
    UILabel *tapCountLabel;
    UIImageView *imageView;

    SampleData *sampleData;

    id&lt;SampleViewControllerDelegate&gt; delegate;

    UISwipeGestureRecognizer *swipeLeftRecognizer;
    UISwipeGestureRecognizer *swipeRightRecognizer;
    UITapGestureRecognizer *tapRecognizer;
}

@property (nonatomic, retain) IBOutlet UILabel *sampleIdLabel;
@property (nonatomic, retain) IBOutlet UILabel *nameLabel;
@property (nonatomic, retain) IBOutlet UILabel *tapCountLabel;
@property (nonatomic, retain) IBOutlet UIImageView *imageView;
@property (nonatomic, retain) SampleData *sampleData;
@property (nonatomic, retain) id&lt;SampleViewControllerDelegate&gt; delegate;

- (void) loadSampleData:(SampleData *) aSampleData;

@end

and in the implementation simply forwards to the appropriate method of the delegate:

SampleViewController.m snippet

- (void)handleSwipeLeftFrom:(UISwipeGestureRecognizer *)recognizer {
    [delegate handleSwipeLeftFrom:self];
}

- (void)handleSwipeRightFrom:(UISwipeGestureRecognizer *)recognizer {
    [delegate handleSwipeRightFrom:self];
}

- (void)handleTap:(UITapGestureRecognizer *)recognizer {
    self.sampleData.tapCount += 1;
    [self updateTapCountLabel];
}

The delegate owns the three instances of SampleViewController, so is able to properly manage the animation between views:

Demo2010Dec19ViewController snippet (SampleViewControllerDelegate implementation)

- (void) handleSwipeLeftFrom:(SampleViewController *) source {
    if (source == centerSVC) {
        [UIView animateWithDuration:SLIDE_DURATION
                         animations:^{
                             centerSVC.view.frame = leftFrame;
                             rightSVC.view.frame = centerFrame;
                         }];

        // move untouched view to other side, and adjust names for next cycle
        leftSVC.view.frame = rightFrame;
        SampleViewController *tempSVC = centerSVC;
        centerSVC = rightSVC;
        rightSVC = leftSVC;
        leftSVC = tempSVC;

        // cache next sample
        currentIdx = [self checkIdx:currentIdx+1];
        int rightIdx = [self checkIdx:currentIdx+1];
        [rightSVC loadSampleData:[samples objectAtIndex:rightIdx]];
    }
}

More to be done

There is much that can easily be done to enhance this example, some of which I will be adding to my client’s app. Things like:

  • Adding a UIPageControl at bottom
  • Adding fade-in/fade-out toolbars for extra navigation (like the Kindle App)
  • Implementing momentum on swiping so fast swiping moves past multiple views

Hopefully this helps someone get over the hurdle of animating between sibling views. I know I made several simplifications to my original code while preparing the sample code for this blog.

You may download the sample project and use the code however you wish.

Merry Christmas!!

I wish all of you a very Merry Christmas.

Make sure you take time to relax with family and friends this week, but also take some time to read and consider the original Christmas story.


We all need the support of others to do our best. Find other like-minded developers that will provide encouragement and motivation through local user groups, regular conferences or meetups. This post is part of iDevBlogADay which has really helped me stay on track with my writing and my iOS projects.

Also, here is a little more information about me, Doug Sjoquist, and how I came to my current place in life. You should follow me on twitter and subscribe to my blog. Have a great day!