Mocking URL request with Xcode 7 UI Testing

Filed in iOS Development | Comments (0) |

Mocking URL request with Xcode 7 UI Testing

I started answering a question on Apple’s new dev forums and decided it would be better as a simple blog post.

(The question was “UI Testing Mocking Data Xcode 7”, https://forums.developer.apple.com/message/25973 )

Super simple overview of problem I want to solve:

  • New UI Tests run in separate process from app, so my old way of mocking URL responses would no longer work
  • I did not want any dependencies on external servers or processes
  • I wanted to have everything about my UI Test case embedded in the test case file itself
  • It needs to run on a CI server like Jenkins

My solution (currently a work in progress)

My solution is a little more involved than I would like, but I think it will work pretty well for me.

To make this work, I need to do some minimal setup in the app itself to make it “test ready”. Since there are only two ways a UI Test case can cause changes of any kind in the app:

  1. The actual UI interaction (the main point of the test)
  2. The launch arguments for XCUIApplication
#2 seemed the reasonable choice.

Summary of changes to the app itself

My goal was to make the minimum set of changes to the main app as I could:

  • Added a class, TestingProxyClient, which uses NSURLProtocol to call a proxy for all network requests
  • Added some helper functions in StartupControl.m to interpret the launch arguments passed from the test case (StartupControl also initializes the proxy client)
  • Updated app’s main.m to call the setup function defined in StartupControl

Summary of changes to the test cases

My intent is for the test case to embed everything needed in the same place.
 
The following are mostly finished:
  • Start a embedded webserver to act as a network proxy (using BCDWebServer, available on github)
  • Use launch arguments of XCUIApplication instance to pass values to the app (including the proxy address & port)

Still to do:

  • Port my existing mock data supplier to this new structure

Other changes

Update #3 (01-Aug-2015): Back to red: The dialog started appearing again for reasons I cannot discern…bummer.  (I made no changes to version of Xcode, beta or production, so I’m confused)


Update #2: Apparently the answer is much simpler and I was over thinking it. I’ll hold off final judgment for a day or two though.  I added ‘Xcode-beta.app’ to the exception list in the firewall options panel and it seems happy again.


Update: This apparently does not fix the issue — the dialog started appearing again today and what I thought fixed it yesterday does not work today…hmm, back to the drawing board.

One other change was necessary to ensure I could run this on a CI server without any user intervention. When you start up a web server in the simulator, I was getting the application firewall permissions prompt every time.  Obviously, turning off the firewall completely would remove the prompt, but seems like a bad idea.

Screen Shot 2015 07 20 at 9 34 43 AM

It probably took me longer than it should have to figure out the answer, but it is reasonably straight forward. There are two steps:

  1. ensure the application firewall’s automatically allow signed apps permission is checked
  2. ensure the XCTRunner binary is signed (this is the actual OS X app that runs the UI tests, not sure why it wasn’t signed by default on my machine)
#1 is simple:
  • select Security & Privacy from settings
  • click the Lock icon to make changes
  • click the Firewall options button
  • ensure the “Automatically Allow Signed Apps…” checkbox is checked
I found the answer to #2 from this blog post, just open up a terminal window and execute these steps:
  • /usr/libexec/ApplicationFirewall/socketfilterfw –setglobalstate on
  • /usr/libexec/ApplicationFirewall/socketfilterfw -s “/Applications/Xcode-beta.app//Contents/Developer/Platforms/iPhoneSimulator.platform/Developer/Library/Xcode/Agents/XCTRunner.app/XCTRunner”
 

Tentative conclusion

I think I have solved all the issues that would prevent this from working and am finishing up the implementation now

This approach lets me put almost everything in just the test case: UI steps, data to mock, etc. which should make it reasonably straightforward to run on our CI server (Jenkins).  

This will also let individual test cases setup the mock data supplier with the URLs and responses to mock.

Hopefully this will help someone else out there


Coffee, Tea, iPhone App: One of These Things is Not Like the Other

Filed in iDevBlogADay, iOS Development | Comments (0) |

If you hang around iOS developers, you’ve probably heard a lament something like:

Why will people pay $4.99 for a cup of coffee, but won’t buy spend $2.99 on my app?

This almost evokes feelings from the great depression, doesn’t it?

Once I built a railroad; now it’s done. Brother, can you spare a dime?

Learning from bad analogies

Most app makers I know consider this a bad analogy and they are correct–it is weak.  Purchasing a cup of coffee and purchasing an iPhone app have very little in common, but examining why this analogy is weak teaches me something useful. 

I have been thinking1 and reading2 about this a lot lately to gain some perspective, and my hypothesis is this:

There is a cognitive burden implied by a $5 app purchase that is not implied by a $5 coffee purchase.

For habitual coffee purchasers, a cup of coffee is a known thing. The purchaser *knows* they will feel comfortable with it in their hand, that they will receive a boost of energy, and that once purchased they won’t have to think about it any more. This is the proverbial “no brainer” which leads to little or no hesitation.

When I spend any amount of money for an app, even $0.99, I think about it differently and it adds a subconscious burden that rattles around my brain3 that makes me hesitate just long enough to trigger a different thought process.

Cognitive burdens

A little light went off today when I clicked on a link to Amazon for a book that sounded interesting. I am definitely the target demographic for this book, and the $7.99 price was immaterial to me so I started skimming the customer reviews. All of the “most helpful” reviews were high except for one. It was middle of the road and it’s basic claim was that the book was okay, but mediocre. That made me hesitate in clicking the “buy now” button because it changed my thinking from “this book is worth a shot” to “I don’t think I want to invest much time figuring out if which reviews are correct.” The small mental burden of thinking I would need to at least skim the book turned me off. Did I miss a great opportunity? Perhaps, but I don’t think I will ever know.

When I am in “normal user”4 mode this thought process usually applies when a paid app catches my eye:

  1. If I pay for this, I should at least try it enough to see if I like it,
  2. Wait, I don’t really care about the price, but I do have enough things to do. Do I really want to commit to X minutes to try it?
  3. Never mind…

There is also good research5 that demonstrates that any price, even 1 cent, triggers different thought processes. The difference between free & almost free is disproportionately large compared to price difference between two non-free choices.

My thought process for a free app that looks interesting is more like this:

  1. I think I’ll download this to check out later,
  2. I know I may lose interest or forget why I downloaded it and delete it, but who cares?
  3. Download it…

Implications

So, what are the implications of this and how can I take advantage of it?

If I am going to have a paid app:

  • I need to focus on helping customers understand the value to lessen their hesitation,
  • I need to convince users outside the app store that the commitment to try it is worth their time,
  • If I can do that, then asking for money is not as big a deal as it might be,
  • If it is too difficult to convince users of the likely value without a trial, I should strongly consider free + subscription or IAP instead,
  • Early in their usage, I need to give purchasers solid reasons to believe purchasing was a good decision.

If I am going to have a free app:

  • Since free requires no commitment, there is a much greater chance the downloader won’t try it at all, or only superficially,
  • So, I have even less time to convince the user to keep using the app once they do start it.

In either case:

  • I need to find strong incentives for users to try it now while they are thinking about it, rather than put off the decision.

And finally

  • Building a business is a lot harder than just building an app.

Well, lots to do, time to get back to work!

Doug


Here is a little more information about me, Doug Sjoquist, and how I came to my current place in life. Hope you have a great day!


1. AppStore pricing articles

Summer 2012

Spring 2013

Fall 2013

2. Current app development

I am in the early stages of developing an app that has great potential to be a sustainable business, so marketing, pricing, and customer acquisition thoughts occupy my mind constantly.

If you are interested, sign up to get more information on our SoccerHub App

3. Stuff that rattles around in your head

I learned a lot from David Allen’s book Getting Things Done even though I don’t follow his methods successfully. Statements like “You can fool everyone else, but you can’t fool your own mind” and “Your mind is for having ideas, not holding them” remind me that even when I don’t realize it, things rattling around my head have an influence on my decisions.

4. Developer purchasing mindset

As a developer the thought process for purchasing some apps is different, I may want to see how a particular interaction is handled, or what some other part of the app looks like. So sometimes, I’ll buy 4 or 5 apps in a niche just to compare some feature.

5. Pricing research

I just finished reading Priceless: The Myth of Fair Value (and How to Take Advantage of It) and it had a lot of very interesting stories and potentially valuable insights in regards to pricing. In particular, he talked about the Hershey’s Kisses experiment performed by Dan Arierly

WWDC and The Innovator’s Dilemma

Filed in iDevBlogADay, iOS Development | Comments Off on WWDC and The Innovator’s Dilemma |

WWDC and The Innovator’s Dilemma

I was reading Mark Suster’s post Understanding How The Innovator’s Dilemma Affects You today and it struck me how closely my thoughts on WWDC line up with Clay Christenson’s ideas.

Not surprisingly, there has been lots of twitter and blog activity this week about Apple’s dilemma in regards to WWDC. Is it broken? Does it need fixing? Does it need replacing? Does it just need to go away?

I’m not sure what will or should happen with WWDC, but I think there is a real danger here for Apple:

  • Apple is successful because they work hard at doing what is best for their customers, which turns into good things for Apple.
  • Continuing to please customers with better stuff than their competitors drives them forward.
  • Developers are an important component of that success, even if they are not the driving force.
  • A big part of what makes Apple’s products great is their consistency of purpose, style, and use.
  • WWDC and other developer focused activities play a key part in helping third party apps maintain that consistency.

Apple’s dilemma

If developers are not regularly being immersed in the Apple way of doing things, will that produce a cultural shift that erodes that consistency?

I’m sure Apple has some smart folks thinking about these things. I am hopeful that, just as with their products, they will find some new and innovative ways to solve it!


Here is a little more information about me, Doug Sjoquist, and how I came to my current place in life. Hope you have a great day!

Renaissance IO 2013 Wrap Up

Filed in iOS Development, Renaissance IO | Comments (0) |

Renaissance IO 2013 Wrap Up

The paradox of choice

There is a well organized and highly regarded developer conference each January in Ohio, CodeMash, that is in very high demand. They sold out over a thousand tickets in minutes, but I managed to get in quickly enough last fall to score a ticket. So by the time I started seeing tweets from Tim Burk and Bill Dudney about Renaissance IO, I was already committed to a late-January conference that looked very good.

I’ve also been to several 360iDev and CocoaConf events over the last few years (you will find great value in either of them) and I plan on attending or speaking at each of them again this year. Each has it’s own style and I have benefitted from them both and look forward to being at each again. But, I was curious to see how Renaissance IO would fit into the iOS conference eco-system.

Having heard Bill speak at conferences, I knew that if he was involved, the conference had great potential. And from what I knew about Tim, I thought they stood a great chance of pulling off something pretty cool. So, I decided to sell my CodeMash registration, sign up for Renaissance IO, and see.

The tl;dr is that it was a great decision.

Apples, oranges, and other fruity things

This post is not an in-depth comparison of conferences, there is a great post over on Ray Wenderlich’s site that does that for several iOS conferences. But since Renaissance IO is new and couldn’t have been on the list, I thought I would share my thoughts while they are fresh.

360iDev mixes a great community with a good multi-track mix of sessions, providing great opportunities for starting new friendships and building on familiar ones. John & Nicole do a great job putting the 4 days together, and really foster an egalitarian feel between speakers and attendees. It has a family reunion (in a good sense!) feel to it.

CocoaConf has a more concentrated multi-track schedule with the goal of delivering solid technical content at several different locations throughout the year. Dave and his family do a great job of recruiting speakers and sessions to cover a wide range of technical topics at different levels. Although it is shorter (2 days + optional all-day pre-conference session) than 360iDev, the camaraderie among speakers and attendees is still very good. (Full disclosure: I’ve spoken at the Columbus location before and will be speaking at the DC and Dallas events this year as well.)

Renaissance IO had the same sense of community, but with a different flavor. There was good interaction between attendees and speakers, with a we are all in this together feel – but it also had a we are serious about moving forward vibe on the business of creating great apps. Tim and Bill selected and orchestrated the single-track of sessions with a clear purpose in mind, giving a very hand-curated focus to the conference.

Renaissance IO overview

Community

Unlike other conferences I have attended, Renaissance was single-track. The format worked well and helped keep the conference and attendees very focused. Another small logistical choice was seating attendees at round tables. Like most people, I picked a table for the day and was able to get to know a small group of people better that way.

The combination of format, seating arrangement, and schedule gave a unique flavor to the interaction. By switching where I sat each day, I was able to get to interact with several different individuals and small groups, but each day felt a little like a well organized dinner party. The combination worked great.

The only negative aspect was minor, and mostly due to being a version 1.0 conference. A few times, the sessions seemed a little over-stuffed, which squeezed out the available time between sessions as Tim and Bill worked to keep the schedule on track.

Sessions

The sessions were well done, and the speakers well prepared. I greatly enjoyed most of them, and benefitted in some way from all of them. I was occasionally surprised by how much I needed to hear something during a presentation that I initially thought was outside my interests or needs. That is a clear benefit of a single-track conference done well. In fact, this was the first conference where I did not skip any sessions (the seating arrangement was a strong influence on that choice.) Even though this was a 1.0 version of a conference, it did not feel like it at all.

I learned new things and was reminded of others that I can immediately apply to my business and app development, and there were many more to think about for the long term. In particular, here are a couple of changes I plan to implement as soon as possible.

A small detail, easily changed, but with a good payback

Des Traynor brought my attention to the importance of making deliberate choices in the selection of the text and micro-copy to use in my apps. He reminded us how blah, vanilla text can easily slip through the development process and into the shipping product without anybody thinking about it.

I am about to deliver the first prototype to a client, but before I do that, I will be reviewing every piece of text with that in mind. I already use obvious placeholders for graphics that are not yet ready, and I need to do that for the text as well. Where possible, I will change the text to clearly convey the message that needs to be delivered. And rather than use safe, generic default text just because I haven’t thought it through yet (things like ‘Done’ or ‘Save’ button labels,) I will change to an obvious placeholder so the vanilla, generic phrases don’t make it into the shipping product.

A simple, but longer term change in the way I plan

As an independent developer, I already track my time pretty well. Even the non-billable time. What I don’t do very well is to plan how I want to use my time based on my business and personal goals and priorities, and what I don’t do at all is evaluate how I’ve used my time in relationship to what I claim to be my priorities.

In the closing keynote, Tim Berry reminded us that although business plans are never right, they are always useful. I will be taking a more deliberate approach to planning the use of my time this year. I already have some clear priorities and goals for the year, and adding a very simple tracking system to compare my actual use of time against those goals on a regular basis will be a great benefit.

Bottom line

Congratulations to Tim, Bill, and all those who helped them organize and implement Renaissance IO 2013.

Well done.

If you are serious about making apps, you need the training, motivation, and cross-pollination that is available in a setting like Renaissance or some other well organized and focused event.

If you have to choose just one, any one of these three conferences could be a good choice. Talk to folks who have been to one or more of these, evaluate what you learn, honestly assess where you are right now in technical skills and business goals, then make the best choice you can.

But don’t let the problem of too many good choices keep you from choosing.


Here is a little more information about me, Doug Sjoquist, and how I came to my current place in life.. Hope you have a great day!

Cleanly Accessing the UITextView field in TWTweetComposeViewController

Filed in iDevBlogADay, iOS Development | Comments (0) |

I have been working with my son Nathan over the last several months, helping him get started doing contract iOS development (check out his first solo app, Cincy Lineup.) While working on an enhancement, he needed to pre-populate the text of a tweet, then position the cursor at the beginning of the field with nothing selected to make it easy for users to customize the tweet.

Apple’s TWTweetComposeViewController is a great component and takes care of most of the details to construct and send tweets for you, but it does not expose any of the fields. We could have looped through the views and subviews directly to find the field we want — but we wanted a safer method that didn’t depend on the current configuration of views, since that can change when iOS is updated.

But, there is a simple, clean approach that does not try to find a particular view inside Apple’s view controller, nor does it depend on any private api’s or structure.

  1. We add a notification observer for UIKeyboardWillShowNotification,
  2. We call ‘presentModalViewController’ with our instance of TWTweetComposeViewController,
  3. When our notification handler method is called, we find the first responder,
  4. We check to see if it is a UITextView,
  5. We set the selection range to the beginning of the field so the cursor is prepositioned where we want it.
…
// at an appropriate place in your code, 
//      add and remove the observer for UIKeyboardWillShowNotification

    [[NSNotificationCenter defaultCenter] addObserver:self 
                                             selector:@selector(handleKeyboardWillShow:) 
                                                 name:UIKeyboardWillShowNotification 
                                               object:nil];
…


- (UIView *) findFirstResponderInView:(UIView*) view
{
    if (view.isFirstResponder) {
        return view;
    }
    for (UIView *subview in view.subviews) {
        UIView *result = [self findFirstResponderInView:subview];
        if (result) {
            return result;
        }
    }
    return nil;
}

- (void) handleKeyboardWillShow:(NSNotification *) notification;
{
    UIView *fr = [self findFirstResponder:self.tweetSheetViewController.view];
    if ([fr isKindOfClass:[UITextView class]]) {
        UITextView *tv = (UITextView *) fr;
        [tv setSelectedRange:NSMakeRange(0,0)];
    }
}


I hope you find this short tip useful. It has been several months since I posted to iDevBlogADay, hopefully I can get back on the regular writing track.

[Update: the app was approved as expected without any problem]


Here is a little more information about me, Doug Sjoquist, and how I came to my current place in life.. Hope you have a great day!

Introduction to Test Driven Development (TDD) for iOS apps (Part 2 of 4)

Filed in iDevBlogADay, iOS Development | Comments (0) |

Introduction to Test Driven Development (TDD) for iOS apps (Part 2 of 4)

Welcome back to the second part of the tutorial series, “Test Driven Development of iOS apps”.

  • In part one of the series we introduced Test Driven Development (TDD), briefly discussed how it can help your development, and began the process using a simple Tic-Tac-Toe game as our app.
  • In part two we will focus on how to think in a TDD fashion while we finish testing our model, the GameBoard class.
  • In part three will will finish a stand-alone version of our game.
  • In part four we will add some interaction with outside services to demonstrate how to use mock objects to help us test our code’s use of external services.

We will pick up right where we left off in part one, but if you did not follow along part one with your own project, you can download the project file as of the end of part one. Our project already contains the GHUnit and OCMock libraries that we need for our tests, but if you would like help in setting up your own Xcode 4 project to use these libraries, check out the tutorial “Unit Testing in Xcode 4 Quick Start Guide”.

Project Recap 

So far, we have:

  • A little bit of upfront planning and design,
  • A definition of “done” in the form of a small set of general requirements,
  • A defined process to follow for adding to our app,
  • Two simple tests,
  • A list of things still to be done.

In part one, we defined “done” for our Tic-Tac-Toe game as the ability:

  • for a human player to enter their move;
  • for a computer player to choose a move;
  • to track the state of the game;
  • to check whether moves are valid;
  • to start the game;
  • to know if someone wins;
  • to know if the game is a draw.

And finally, we stopped after writing only two pretty simple tests:

  • testValidMove_row0_col0
  • testTwoValidMoves
Remember, you will learn the most from this tutorial by following the steps and doing the work yourself, but if you get stuck, see the note at the end of the tutorial to see how to jump to specific points in the tutorial.1

Clearly, we have more to accomplish before our game is ready, so let’s begin.

Revisiting Our To Do List

At this point in our project, we probably have many thoughts swirling around our minds about what features and tests we might need. We want to record those thoughts since some are probably useful bits to remember. Also, writing them down will relieve our brain of the need to keep those thoughts front and center when we are working on a particular test.

We have a ‘Tests to add:’ section in our todo list, but we only want to add very concrete tests that we know we need to this section. In part one, we recorded some, but in reading our required abilities listed above, there are few other clearly defined requirements we can add. We know enough about our design to realize other items that need to be addressed somehow, but are still undefined or uncertain. Let’s add them under a new section called ‘Things to consider’.

After adding them, our todo.txt file looks like this:

// ttt_2_001
Tests to add:
- test that GameBoard detects moves outside valid range
- test that GameBoard detects when a makes an invalid move 
  (selects a move already made by a player)
- test that GameBoard to make sure only two players can be used for a given game
- test that GameBoard requires players to alternate between turns
- test that GameBoard can detect a winning player
- test that GameBoard can detect a draw (board is full with no winner)

Things to consider:
- mechanism for computer to choose a move
- mechanism to start game
- mechanism to know whose turn it is
- mechanism for user to enter move

Write Failing Test, Make It Pass, Repeat

It is time to dive back into our TDD process, which we loosely defined in part one as:

  • Based on our current understanding and task list, decide on what behavior we want to add next;
  • Think about a good way to test it;
  • Write a small test that uses that behavior and clearly expresses our expectation of the results;
  • Write just enough code that will let the test compile, but still fails because our expectations were not met;
  • Run the test and watch it fail so we know we the test is being exercised;
  • Write or modify just enough code to make the new test pass;
  • Ensure all existing tests still pass.

Picking what behavior to add next

Since the GameBoard class has no external dependencies, testing it is straightforward. So the best choice for “what’s next” is probably to finish many of its requirements before moving on. Looking at our list of tests to add, the first item seems like a great place to start: “test that GameBoard detects moves outside valid range”.

The tendency at this point is to dive into GameBoard and start adding a method, but first let’s think about what behavior we need before writing any code or test.

Thinking in TDD fashion — Just In Time Design

The first two tests we wrote did not make any provision for invalid moves. They did not need to consider what to do about bad moves at the time, so we did nothing. But now this rather simple requirement raises the subject of error handling, and specifically the question of how we want our app to handle errors, so we need to think about this decision at a little higher level than just this one behavior.

Error handling is one of those design decisions that will affect many parts of our app, so we don’t want to just do something random here. We also don’t want to get bogged down into writing some fancy error handling framework either. It is wise to be consistent in error handling across our app, so our design decision needs to fit this particular case, as well as work for the most common cases.

Error handling in our app

There are many existing software patterns for error handling, three common ones are:

  1. Special return codes from functions — this is a common pattern in pure C/C++ development.
  2. Exceptions, along with try / catch syntax — most common in Java, but Objective-C supports a similar style.
  3. NSError — Passing an error argument to methods that might fail, this is standard behavior in many Cocoa frameworks from Apple and third parties.

Special return codes used for error conditions are probably the simplest to implement, but their big drawback is how to handle functions or methods that already need to return a value. I think we can safely discard this option.

Exceptions, as evidenced by their very name, should not be common conditions, but rather things that fall outside the expected, normal behavior of the code we are writing. Part of our decision process is deciding how “exceptional” we expect error conditions to be. We could make a reasonable case that since we control all aspects of our app, it would be very unusual for our GameBoard class to ever receive a request to make an invalid move. That might make Exceptions a reasonable choice.

It is wise to choose a pattern that fits the usage of standard libraries and frameworks, which makes using the NSError pattern a good one for any Cocoa/UIKit app. In fact, Marcus Zarra makes a very good case for it in his NSError tutorial.

At some point, we simply need to make a design decision and move forward. Fortunately, if we need to change one of those decisions later, we will have a great body of tests to make sure our app still behaves as expected. This is a big win for automated testing in general, and TDD in particular — it may not make it easier to change a decision later, but it does make it possible.

We will use NSError in our app. Fortunately, the standard NSError usage pattern is pretty basic:

  1. Create an NSError reference and set it to nil,
  2. Pass it to our method,
  3. Check its value after the method call.

The only quirk is how we pass the instance of NSError to our method. We pass in a reference (a pointer) to the NSError reference, it is a pointer to a pointer. The extra level of indirection is useful so that we only have to create an instance of NSError when we have an error, but a fuller explanation is beyond the scope of this tutorial. I encourage you to read Marcus’s article for a fuller explanation.

Our next test: test that GameBoard detects moves outside valid range

Now that our error handling decision has been made, how do we test for an invalid move? We modify our movePlayer:row:col: method to also take an NSError reference so that we can return an error if the move was invalid. Our new test case should look like this:

// ttt_2_002

- (void) testMoveOutsideRange {
    NSError *error = nil;    
    [gameBoard movePlayer:@"playerA" row:-1 col:-1 error:&error];
    GHAssertNotNil(error, @"Expected an error");
}

Since our move method now will require an additional argument, existing tests for valid moves will need to change as well. Add NSError to each of our older test cases, and check the result to make sure valid moves do not generate errors:

// ttt_2_002

- (void) testValidMove_row0_col0 {
    NSError *error = nil;    
    [gameBoard movePlayer:@"playerA" row:0 col:0 error:&error];
    GHAssertNil(error, @"Expected no error");
    
    GHAssertEqualStrings(@"playerA", [gameBoard playerAtRow:0 col:0], 
                         @"playerAt... should return 'playerA'");
}

- (void) testTwoValidMoves {
    NSError *error = nil;    
    [gameBoard movePlayer:@"playerA" row:0 col:0 error:&error];
    GHAssertNil(error, @"Expected no error");
    
    error = nil;
    [gameBoard movePlayer:@"playerB" row:1 col:1 error:&error];
    GHAssertNil(error, @"Expected no error");
    
    GHAssertEqualStrings(@"playerA", [gameBoard playerAtRow:0 col:0], 
                         @"playerAt 0 0 should return 'playerA'");
    GHAssertEqualStrings(@"playerB", [gameBoard playerAtRow:1 col:1], 
                         @"playerAt 1 1 should return 'playerB'");
}

When we build our test target in Xcode now, we see four warnings, ‘GameBoard’ may not respond to ‘-movePlayer:row:col:error:’. If we attempt to run our tests now, the test app will not run correctly, so let’s modify the method signature of ‘movePlayer’ to include the error argument. We will not add any behavior that depends on the argument yet, because we want to see our new test case fail.

Modify the method signature in GameBoard.h and GameBoard.m to include an NSError** argument (note the double ‘*’, the pointer to a pointer). The signature should now look like this:

// ttt_2_002

- (void) movePlayer:player row:(int) row col:(int) col error:(NSError **) error;

Now we can run our tests properly. Our existing tests still pass because nothing has really changed, but our new test fails since there is no error checking occurring yet.

Finally, we now implement the error checking using NSError by checking the range of our input and creating an instance of NSError to hold any context we want available to the calling method. Our new movePlayer method now looks like this:

// ttt_2_003

- (void) movePlayer:player row:(int) row col:(int) col error:(NSError **) error {
    if ((row < 0) || (row > 2) || (col < 0) || (col > 2)) {
        NSMutableDictionary *errorDetail = [NSMutableDictionary dictionary];
        [errorDetail setValue:[NSString stringWithFormat:@"Invalid move %d,%d", row, col] 
                       forKey:NSLocalizedDescriptionKey];
        *error = [NSError errorWithDomain:@"GameBoard" code:100 userInfo:errorDetail];
        return;
    }
    
    board_[row][col] = player;

}

Finish Tests for Error Conditions in GameBoard

We have two kinds of the items in our ‘Tests to Add’ list for our GameBoard class. Some are to detect end states in our game, and will require some more thought and discussion. But the others test for more error conditions and will be very similar to what we have already done.

Refactor time: adding standard error codes

We have reached a point where it is wise to do some refactoring before adding more tests for new behavior. Since we want to be able to test for specific errors, it will be useful to have some standard constants. Let’s create a file ‘TDD_TicTacToeConstans.h’ and add constants for our error codes. So far, we only have one type of error, so our initial version looks like this:

// ttt_2_004
//  TDD_TicTacToeConstants.h

#define kError_invalidBoardPosition 101

We need to add the import statement to GameBoard.m and TestGameBoard.m:

// ttt_2_004

#import "TDD_TicTacToeConstants.h"

then modify GameBoard.m to use the correct code

// ttt_2_004

- (void) movePlayer:player row:(int) row col:(int) col error:(NSError **) error {
    if ((row < 0) || (row > 2) || (col < 0) || (col > 2)) {
        NSMutableDictionary *errorDetail = [NSMutableDictionary dictionary];
        [errorDetail setValue:[NSString stringWithFormat:@"Invalid move %d,%d", row, col] 
                       forKey:NSLocalizedDescriptionKey];
        *error = [NSError errorWithDomain:@"GameBoard" 
                                     code:kError_invalidBoardPosition 
                                 userInfo:errorDetail];
        return;
    }
    
    board_[row][col] = player;
}

and finally, update our test case to check for this specific code:

// ttt_2_004

- (void) testMoveOutsideRange {
    NSError *error = nil;    
    [gameBoard movePlayer:@"playerA" row:-1 col:-1 error:&error];
    GHAssertNotNil(error, @"Expected an error");
    GHAssertEquals([error code], (NSInteger) kError_invalidBoardPosition, @"Expected invalidBoardPosition error code");
}

(Because GHUnit uses macros for its assertions, they can be particular about the arguments. Because of this, we need to cast our error constant to be an NSInteger, since that is what [error code] returns. Otherwise, the compiler may have issues with our GHAssertEquals line.)

Since we have made changes, we need to run our tests again. They should all still pass. We have not added any new behavior, so if any tests fail, it must be in our latest set of changes.

Test for another type of invalid move

We now want to add a test to make sure a player’s move is into an available spot.

Add a new constant for our new error code:

// ttt_2_005

#define kError_invalidMove 102

Add the following test case to TestGameBoard.m:

// ttt_2_005

- (void) testInvalidMove {
    NSError *error = nil;    
    [gameBoard movePlayer:@"playerA" row:0 col:0 error:&error];
    GHAssertNil(error, @"Expected no error");
    
    [gameBoard movePlayer:@"playerB" row:0 col:0 error:&error];
    GHAssertNotNil(error, @"Expected an error");
    GHAssertEquals([error code], (NSInteger) kError_invalidMove, 
                   @"Expected invalidMove error code");
}

GameBoard.m is not yet checking for this type of error, so when we run our tests, this test should fail. Run the tests to verify that this test fails.

To make this test pass, we need to add a check for this type of error in GameBoard.m. Our new movePlayer method should look like this:

// ttt_2_006

- (void) movePlayer:player row:(int) row col:(int) col error:(NSError **) error {
    if ((row < 0) || (row > 2) || (col < 0) || (col > 2)) {
        NSMutableDictionary *errorDetail = [NSMutableDictionary dictionary];
        [errorDetail setValue:[NSString stringWithFormat:@"Invalid move %d,%d", row, col] 
                       forKey:NSLocalizedDescriptionKey];
        *error = [NSError errorWithDomain:@"GameBoard" 
                                     code:kError_invalidBoardPosition 
                                 userInfo:errorDetail];
        return;
    }
    
    if (board_[row][col] != nil) {
        NSMutableDictionary *errorDetail = [NSMutableDictionary dictionary];
        [errorDetail setValue:[NSString stringWithFormat:
                                 @"Position %d,%d occupied by %@", row, col, board_[row][col]] 
                       forKey:NSLocalizedDescriptionKey];
        *error = [NSError errorWithDomain:@"GameBoard" 
                                     code:kError_invalidMove
                                 userInfo:errorDetail];
        return;
    }
    
    board_[row][col] = player;
}

Test that we never have more than two players on the board

We now need to verify that only two players are playing on our game board. First, add a new error code for this type of error:

// ttt_2_007

#define kError_tooManyPlayers 103

and add this test case to TestGameBoard.m:

// ttt_2_007

- (void) testOnlyTwoPlayersAllowed {
    NSError *error = nil;    
    [gameBoard movePlayer:@"playerA" row:0 col:0 error:&error];
    GHAssertNil(error, @"Expected no error");
    
    [gameBoard movePlayer:@"playerB" row:0 col:1 error:&error];
    GHAssertNil(error, @"Expected no error");
    
    [gameBoard movePlayer:@"playerC" row:0 col:2 error:&error];
    GHAssertNotNil(error, @"Expected an error");
    GHAssertEquals([error code], (NSInteger) kError_tooManyPlayers, @"Expected tooManyPlayers error code");
}

Again, run the tests, and this new test should fail (but the others should still pass!).

In order to determine that there are only two players for a game, we will need to keep track of players that have already moved in our GameBoard class. Let’s keep it simple for now and just create an instance of NSSet to hold all player names. If we ever try to add a third player, then we have an error.

Modify GameBoard.h to add a set to store existing players:

// ttt_2_008

#import <Foundation/Foundation.h>

@interface GameBoard : NSObject {
    NSString *board_[3][3];
    NSMutableSet *players_;
}

- (void) movePlayer:player row:(int) row col:(int) col error:(NSError **) error;
- (NSString *) playerAtRow:(int) row col:(int) col;

@end

and then modify GameBoard.m to create the set in our init method, release it in our dealloc, and use it in our movePlayer method.

// ttt_2_008

@implementation GameBoard

- (id) init {
    if ((self = [super init])) {
        players_ = [[NSMutableSet alloc] init];
    }
    return self;
}

- (void) dealloc {
    [players_ release],     
    [super dealloc];
}

- (void) movePlayer:player row:(int) row col:(int) col error:(NSError **) error {
    if ((row < 0) || (row > 2) || (col < 0) || (col > 2)) {
        NSMutableDictionary *errorDetail = [NSMutableDictionary dictionary];
        [errorDetail setValue:[NSString stringWithFormat:@"Invalid move %d,%d", row, col] 
                       forKey:NSLocalizedDescriptionKey];
        *error = [NSError errorWithDomain:@"GameBoard" 
                                     code:kError_invalidBoardPosition 
                                 userInfo:errorDetail];
        return;
    }
    
    if (board_[row][col] != nil) {
        NSMutableDictionary *errorDetail = [NSMutableDictionary dictionary];
        [errorDetail setValue:[NSString stringWithFormat:@"Position %d,%d occupied by %@", row, col, board_[row][col]] 
                       forKey:NSLocalizedDescriptionKey];
        *error = [NSError errorWithDomain:@"GameBoard" 
                                     code:kError_invalidMove
                                 userInfo:errorDetail];
        return;
    }
    
    if ([players_ count] < 2) {
        [players_ addObject:player];
    } else {
        if (![players_ containsObject:player]) {
            NSMutableDictionary *errorDetail = [NSMutableDictionary dictionary];
            [errorDetail setValue:[NSString stringWithFormat:@"Only two players allowed per game, cannot add %@", player] 
                           forKey:NSLocalizedDescriptionKey];
            *error = [NSError errorWithDomain:@"GameBoard" 
                                         code:kError_tooManyPlayers
                                     userInfo:errorDetail];
            return;
        }
    }
    
    board_[row][col] = player;
}

- (NSString *) playerAtRow:(int) row col:(int) col {
    return board_[row][col];
}

@end

After these changes, when we run our tests, all of them should pass.

Last test for an error in GameBoard, ensure players alterate turns

We have one last error condition to test for in GameBoard, we need to make sure players take turns.

Add the new error code to our constants file:

// ttt_2_009

#define kError_playersMustAlternate 104

and this test case to TestGameBoard.m:

// ttt_2_009

- (void) testAlternatePlayers {
    NSError *error = nil;    
    [gameBoard movePlayer:@"playerA" row:0 col:0 error:&error];
    GHAssertNil(error, @"Expected no error");
    
    [gameBoard movePlayer:@"playerA" row:0 col:1 error:&error];
    GHAssertNotNil(error, @"Expected an error");
    GHAssertEquals([error code], (NSInteger) kError_playersMustAlternate, 
                   @"Expected playersMustAlternate error code");
}

By now you should be beginning to develop the TDD habit: add a failing test, run the tests, watch the new test fail, wrote code to fix it. Keep it up, before too long it will become second nature!

Now we just need to modify GameBoard to make this pass. The simplest method is to add an instance variable to store the last player that made a valid move, and make sure they don’t do two in a row.

Add and instance variable to our interface in GameBoard.h:

// ttt_2_010

    NSString *lastPlayer_;

And then after all the other tests in our movePlayer method in GameBoard.m, check to make sure the same player is not trying to go twice in a row. Then once a valid move was made, remember who it was:

// ttt_2_010

- (void) movePlayer:player row:(int) row col:(int) col error:(NSError **) error {
...    
    if ([player isEqualToString:lastPlayer_]) {
        NSMutableDictionary *errorDetail = [NSMutableDictionary dictionary];
        [errorDetail setValue:[NSString stringWithFormat:@"Players must alternate turns, player: %@", player] 
                       forKey:NSLocalizedDescriptionKey];
        *error = [NSError errorWithDomain:@"GameBoard" 
                                     code:kError_playersMustAlternate
                                 userInfo:errorDetail];
        return;
    }
    
    board_[row][col] = player;
    lastPlayer_ = player;
}

Finish Tests for End State Conditions in GameBoard

Now that we have tested for all the error conditions we listed, we need to move on to checking for end states in our game board.

There are two different end states: winning and a draw. Winning means one player with three in a row horizontally, vertically, or diagonally. A draw is simply defined as a full board with no winner.

Test helper classes

Writing tests for all the winning or draw states can be quite tedious without using some helper methods or classes.

One approach is to write some helper methods within the test class that takes some sort of list of moves and makes them one by one, leaving our board in the desired state. Since our game is simple and moves happen quickly, this method would work okay if we wanted to use it.

Another approach is to subclass the class being tested, adding initializers or other methods to configure the object in a known state. That way our tests can be assured of a known start state without having to go through all the normal steps to arrive at that state. We will use this method in our tests to demonstrate how to do it. We will create a separate class file for our preconfigured game board to test, and create a new test class file as well since the type of tests we are doing will require a different setup than our tests for error conditions.

Create skeleton for new test class files

Create the class PreconfiguredGameBoard as a subclass of GameBoard in the TDD_TicTacToeTests target:

// ttt_2_011

#import <Foundation/Foundation.h>
#import "GameBoard.h"

@interface PreconfiguredGameBoard : GameBoard {
}

@end

Then, create the class TestGameBoardEndStates in the TDD_TicTacToeTests target, delete the TestGameBoardEndStates.h file and modify TestGameBoardEndStates.m to look like this:

// ttt_2_011

#import <GHUnitIOS/GHUnitIOS.h>
#import "PreconfiguredGameBoard.h"
#import "TDD_TicTacToeConstants.h"

@interface TestGameBoardEndStates : GHTestCase { }
PreconfiguredGameBoard *gameBoard;
@end

@implementation TestGameBoardEndStates

- (void) setUp {
    [super setUp];
    
    gameBoard = [[PreconfiguredGameBoard alloc] init];
}

- (void) tearDown {
    [gameBoard release];
    
    [super tearDown];
}

@end

To ensure we did not break existing code, run our tests again. Since we haven’t added any tests to our new test class yet, only the six tests in TestGameBoard should be listed, but they should all still pass.
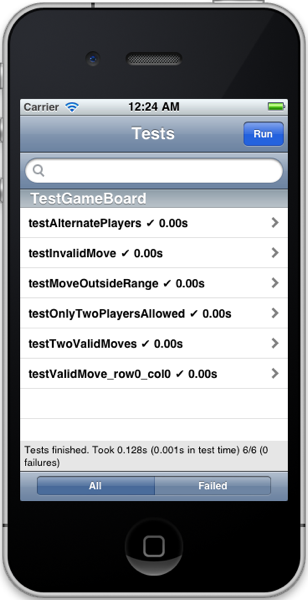
TDD TicTacToe 8

Add helper methods to preconfigure board state

We need a convenience method to set the internal state of our PreconfiguredGameBoard class. Since these tests will be checking a given state for a winner or draw, we don’t care about anything but the board itself. It will be enough to set the internal board_ array to a known set of values, then test for a particular end state.

Since we will be using this method call many times, we want to make it easy to set up a new board. Fortunately, the simplest approach to implement is also very simple to use:

// ttt_2_012

- (void) setInternalBoard:(NSString*[3][3]) newBoard {
    for (int row=0; row<3; row++) {
        for (int col=0; col<3; col++) {
            board_[row][col] = newBoard[row][col];
        }
    }
}

You might find it helpful to have a method that produces a printout of the current board state in a simple, but quickly readable form. If so, add one more method to our PreconfigureGameBoard class to do that:

// ttt_2_012

- (void) displayBoard {
    NSLog(@"board");
    for (int row=0; row<2; row++) {
        NSLog(@"%@, %@, %@", board_[row][0], board_[row][1], board_[row][2]);
    }
}

(Anytime you are not sure your test board is configured correctly, simply add a call to [gameBoard displayBoard] to give yourself the assurance it is working as expected.)

Our first, simplistic test for a winner in the first row

Since the definition of a draw depends on the definition of a winning board, we need to test for winning states first. The simplest first test we can write would be to see if we can detect a winner when the first row of our board is all the same player, like this:

  X  |  X  |  X
-----+-----+-----
  O  |     |  O
-----+-----+-----
  O  |  O  |

We can now add a test for this state:

// ttt_2_012

- (void) testFirstRowIsWinner {
    [gameBoard setInternalBoard:(NSString *[3][3]) { 
        {@"X", @"X", @"X"},
        {@"O", nil, @"O"},
        {@"O", @"O", nil}
    }];
    GHAssertTrue([[gameBoard winner] isEqualToString:@"X"], @"X should win this game");
}

Xcode will show this warning when we build: ‘PreconfiguredGameBoard’ may not respond to ‘-winner’. To keep our testing process moving along smoothly, lets add an empty method ‘winner’ to our GameBoard class that returns nil for now. This will allow our test to run to completion and fail.

// ttt_2_012

- (NSString *) winner {
    return nil;
}

When we run our tests now, our test ‘testFirstRowIsWinner’ should fail, and all the other tests should pass.

Now we need to make our test pass in the simplest way possible. Using a crude check of just the first row in our ‘winner’ method, we can make this test pass:

// ttt_2_013

- (NSString *) winner {
    NSString *currentValue = board_[0][0];
    if (currentValue
        && [currentValue isEqualToString:board_[0][1]]
        && [currentValue isEqualToString:board_[0][2]]) {
        return currentValue;
    }

    return nil;
}

Running our tests now — they all pass, Woohoo!

Generalizing our test for any horizontal row

Our implementation of winner is obviously too simplistic. But since our loop of “write failing test, run tests, make test pass” is becoming a habit, and all of our tests execute quickly, it is better to err on the side of increments that are a little too small, rather than ones that try to do too many new things at once.

The obvious next step in our testing is to generalize for all horizontal rows, so let’s add a test for the second row that we know will fail:

// ttt_2_014

- (void) testSecondRowIsWinner {
    [gameBoard setInternalBoard:(NSString *[3][3]) { 
        {@"O", nil, @"O"},
        {@"X", @"X", @"X"},
        {@"O", @"O", nil}
    }];
    GHAssertTrue([[gameBoard winner] isEqualToString:@"X"], @"X should win this game");
}

Unsurprisingly, when we run our tests, this new test fails. But we now have a reason to generalize our ‘winner’ method to handle something besides the first row. Let’s generalize it to handle any horizontal row:

// ttt_2_015

- (NSString *) winner {
    for (int row=0; row<3; row++) {
        NSString *currentValue = board_[row][0];
        if (currentValue
            && [currentValue isEqualToString:board_[row][1]]
            && [currentValue isEqualToString:board_[row][2]]) {
            return currentValue;
        }
    }

    return nil;
}

Our method is still pretty simple, but it works when we run our tests! As we are able to move through the TDD cycle very quickly, it begins to feed an addiction to writing tests and making them pass, which can be a very good place to be.

At this point we could add a test for the third row, but if we did, it is clear than any valid row on the board is covered by our winner method.

Adding a test for the first column

Now let’s tackle the vertical. Since our distinction between rows and columns is arbitrary, we ought to be able to use a very similar pattern to check the columns for winners. First, let’s write a failing test for one of the columns:

// ttt_2_016

- (void) testFirstColIsWinner {
    [gameBoard setInternalBoard:(NSString *[3][3]) { 
        {@"X", nil, @"O"},
        {@"X", @"O", @"O"},
        {@"X", @"O", nil}
    }];
    GHAssertTrue([[gameBoard winner] isEqualToString:@"X"], @"X should win this game");
}

By now, I’m sure you are already running the test suite as soon as we add a new test case. When you did that, you saw this test fail. Now to do the simplest thing we can to make it pass, mimic the change we made to make ‘testFirstRowWinner’ pass:

// ttt_2_017

- (NSString *) winner {
    for (int row=0; row<3; row++) {
        NSString *currentValue = board_[row][0];
        if (currentValue
            && [currentValue isEqualToString:board_[row][1]]
            && [currentValue isEqualToString:board_[row][2]]) {
            return currentValue;
        }
    }
    
    NSString *currentValue = board_[0][0];
    if (currentValue
        && [currentValue isEqualToString:board_[1][0]]
        && [currentValue isEqualToString:board_[2][0]]) {
        return currentValue;
    }
    
    return nil;
}

We are probably moving pretty quickly by this point, but running our tests shows this test case now passes. Time to generalize columns just like we did rows.

Generalizing our test for any vertical column

It is very straightforward to generalize this for all columns, but since we are disciplined developers, we first add a failing test for the second column:

// ttt_2_018

- (void) testSecondColIsWinner {
    [gameBoard setInternalBoard:(NSString *[3][3]) { 
        {nil, @"X", @"O"},
        {@"O", @"X", @"O"},
        {@"O", @"X", nil}
    }];
    GHAssertTrue([[gameBoard winner] isEqualToString:@"X"], @"X should win this game");
}

Clearly, you no longer need a reminder to run the tests again — so you have already seen this test fail when you ran them. Generalizing our column checking is very quick:

// ttt_2_019

- (NSString *) winner {
    for (int row=0; row<3; row++) {
        NSString *currentValue = board_[row][0];
        if (currentValue
            && [currentValue isEqualToString:board_[row][1]]
            && [currentValue isEqualToString:board_[row][2]]) {
            return currentValue;
        }
    }
    
    for (int col=0; col<3; col++) {
        NSString *currentValue = board_[0][col];
        if (currentValue
            && [currentValue isEqualToString:board_[1][col]]
            && [currentValue isEqualToString:board_[2][col]]) {
            return currentValue;
        }
    }
    
    return nil;
}

And running our tests again and seeing them pass now almost gives us an adrenaline rush.

Time for some refactoring

After adding a few tests in a row, it is good to take just a moment and consider our current codebase and test cases. We need to ask ourselves questions like:

  • Is there duplication of code in our tests or our classes being tested that can be removed?
  • Am I sure my test cases are actually testing what I think they are?
  • Do the existing set of tests lead me to other things that should be tested?

In looking at our existing test cases, we realize that we might leave ourselves open to misleading results. Because we have preconfigured our game board with more positions than just the expected winner, we might have left room for false positives to occur. We can eliminate any chance of a false positive by only supplying values for the winning positions, and leaving everything else nil. Since our tests are only testing for a winning position, it does not matter if we leave every other position open.

So, let’s change all our @”O” values to nil. Our test cases should now look like this:

// ttt_2_020

- (void) testFirstRowIsWinner {
    [gameBoard setInternalBoard:(NSString *[3][3]) { 
        {@"X", @"X", @"X"},
        {nil, nil, nil},
        {nil, nil, nil}
    }];
    GHAssertTrue([[gameBoard winner] isEqualToString:@"X"], @"X should win this game");
}

- (void) testSecondRowIsWinner {
    [gameBoard setInternalBoard:(NSString *[3][3]) { 
        {nil, nil, nil},
        {@"X", @"X", @"X"},
        {nil, nil, nil}
    }];
    GHAssertTrue([[gameBoard winner] isEqualToString:@"X"], @"X should win this game");
}

- (void) testFirstColIsWinner {
    [gameBoard setInternalBoard:(NSString *[3][3]) { 
        {@"X", nil, nil},
        {@"X", nil, nil},
        {@"X", nil, nil}
    }];
    GHAssertTrue([[gameBoard winner] isEqualToString:@"X"], @"X should win this game");
}

- (void) testSecondColIsWinner {
    [gameBoard setInternalBoard:(NSString *[3][3]) { 
        {nil, @"X", nil},
        {nil, @"X", nil},
        {nil, @"X", nil}
    }];
    GHAssertTrue([[gameBoard winner] isEqualToString:@"X"], @"X should win this game");
}

And when we run our tests again, lo and behold, they all pass! By now, you should be leery of refactoring your code without a solid set automated tests supporting what you have written.

Checking the diagonals for winners

One last set of winners to test for: diagonal. First, our failing test:

// ttt_2_021

- (void) testDiagonalFrom00IsWinner {
    [gameBoard setInternalBoard:(NSString *[3][3]) { 
        {@"X", nil, nil},
        {nil, @"X", nil},
        {nil, nil, @"X"}
    }];
    GHAssertTrue([[gameBoard winner] isEqualToString:@"X"], @"X should win this game");
}

It fails when we run our tests, as expected.

Our change to ‘winner’ to make it pass is similar to our other winner checks:

// ttt_2_022

- (NSString *) winner {
...
    NSString *currentValue = board_[0][0];
    if (currentValue
        && [currentValue isEqualToString:board_[1][1]]
        && [currentValue isEqualToString:board_[2][2]]) {
        return currentValue;
    }

    return nil;
}

As you see when you run the tests, this was successful in finding a diagonal winner.

Last winner state to check

Let’s add a failing test for our final winner state, the other diagonal:

// ttt_2_023

- (void) testDiagonalFrom02IsWinner {
    [gameBoard setInternalBoard:(NSString *[3][3]) { 
        {nil, nil, @"X"},
        {nil, @"X", nil},
        {@"X", nil, nil}
    }];
    GHAssertTrue([[gameBoard winner] isEqualToString:@"X"], @"X should win this game");
}

This test fails when we run our tests, just like always!

And our solution to this failure is not to generalize. After all, there are only two possible diagonals, and the simplest thing that works is just to check each separately like this:

// ttt_2_024

- (NSString *) winner {
...
    NSString *currentValue = board_[0][0];
    if (currentValue
        && [currentValue isEqualToString:board_[1][1]]
        && [currentValue isEqualToString:board_[2][2]]) {
        return currentValue;
    }
    
    currentValue = board_[0][2];
    if (currentValue
        && [currentValue isEqualToString:board_[1][1]]
        && [currentValue isEqualToString:board_[2][0]]) {
        return currentValue;
    }

    return nil;
}

One last time we run our tests, and watch all twelve tests pass! We have covered all possible winning combinations, there is one last end state to check for — a draw!

Checking for a draw

We can take advantage of the fact that a draw is simply a full board with no winner, but first our failing test:

// ttt_2_025

- (void) testDrawOnFullBoardWithNoWinner {
    [gameBoard setInternalBoard:(NSString *[3][3]) { 
        {@"X", @"O", @"X"},
        {@"O", @"O", @"X"},
        {@"X", @"X", @"O"}
    }];
    GHAssertTrue([gameBoard isDraw], @"This game should be a draw");
    GHAssertNil([gameBoard winner], @"A draw should not also have a winner");
}

Go ahead and add an empty ‘isDraw’ method to our GameBoard class to keep the compiler happy:

// ttt_2_025

- (BOOL) isDraw {
    return NO;
}

Notice that we checked two things in this test case: first, that the game is a draw, and second that we do not declare a draw when there is in fact a winner.

When we run our tests, this new test should fail.

Here is the simplest solution to our test:

// ttt_2_026

- (BOOL) isDraw {
    // check for empty spots in the board
    for (int row=0; row<3; row++) {
        for (int col=0; col<3; col++) {
            if (board_[row][col] == nil) {
                return NO;
            }
        }
    }
    return ![self winner];
}

And indeed, this test now passes. In fact, we now have thirteen tests, and they all pass!
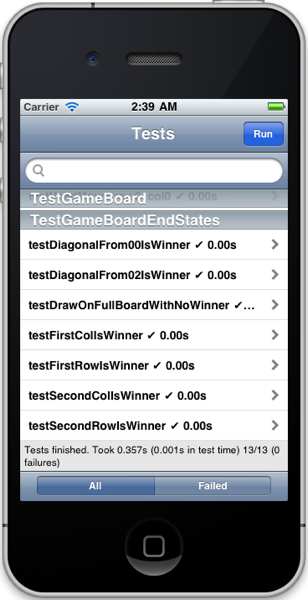
TDD TicTacToe 9

GameBoard Behavior Is Covered By Tests

Double checking our todo list, we see that we have covered all the behavior listed for our GameBoard class so we can remove all the existing ‘Tests to add’ from our to do list. Skimming the test cases in TestGameBoard.m one more time does not bring any new requirements or behavior to mind, so we will call GameBoard “complete” for now.

This leaves us with these ‘Things to consider’ (in a slightly better order) to think about during part 3 of our series:

// ttt_2_027
Tests to add:

Things to consider:
- mechanism to start game
- mechanism for computer to choose a move
- mechanism for user to enter move
- mechanism to know whose turn it is

Next Time

  • In part one we introduced Test Driven Development (TDD), briefly discussed how it can help your development, and began the process using a simple Tic-Tac-Toe game as our app.
  • In part two we focused on how to think in a TDD fashion while we finished testing our model, the GameBoard class.
  • In part three will will finish a stand-alone version of our game.
  • In part four we will add some interaction with outside services to demonstrate how to use mock objects to help us test our code’s use of external services.

Here is the project as of this point with all of the code from the above tutorial.

In the meantime, if you have any questions, comments, or suggestions, feel free to add them below!


DwsjoquistWe all need the support of others to do our best work. Find other like-minded developers that will provide encouragement and motivation through local user groups, conferences or meetups. A great collection of indie iOS developers have helped me stay on track through meetups, 360iDev, twitter, and iDevBlogADay.

I regularly attend Cocoa/iPhone developer meetups in Cincinnati, Ohio and Columbus, Ohio. If you are in the central or southwest Ohio area, come join me at either monthly meetup:

Finally, here is a little more information about me, Doug Sjoquist, and how I came to my current place in life. You should follow me on twitter and subscribe to my blog. Have a great day!


1. If you get stuck, you can use the provided zip file of the full project for this tutorial. I recommend unzipping it into a separate location so you can use it to compare to your own project.

Return to ‘Project Recap’

The zipped project is the end state of this tutorial, but it is possible to skip back and forth to specific points in the tutorial if you are willing to use some commands in a terminal window.

The zipped project file includes a git repository with tags for most steps we took in this tutorial. Each code listing includes a comment specifying the tag that corresponds to the current point in the tutorial, like this:

// ttt_2_000
...

Tag names are just simple labels, and this tutorial uses a very simple convention: a prefix of ‘ttt_2_’ and a three digit sequential number. (The starting point of the work we have done is tag ‘ttt_2_000’.) To avoid confusion and clutter, the tutorial itself does not reference git or tags other than to include the appropriate tag in the comments of code listings.

Unfortunately, even though Xcode 4 has built in support for git, that support does not include tags. To make use of them, you must open up a terminal window, change to the base directory of the project, and issue two basic git commands from there.

For instance, if you unzipped the project file into the directory ‘~/tmp’, you would follow these steps to jump back to the beginning of the tutorial:

Open up a terminal window and enter these commands 
(the prompt may look different, just type what is in bold):

localhost:~ $ cd ~/tmp/TDD_TicTacToe
localhost:~/tmp/TDD_TicTacToe $ git checkout .
localhost:~/tmp/TDD_TicTacToe $ git checkout ttt_2_000

Switch back to Xcode
Build the project
Run the TDD_TicTacToeTests target in the simulator

The git checkout . (don’t forget the ‘.’ at the end) discards any changes you made to provide a clean slate for the next step. It may not always be necessary, but it doesn’t hurt either.

The git checkout ttt_2_000 then moves the project files to the appropriate point in the tutorial.

If you leave the terminal window open, you can simply issue the git commands whenever you like to jump to a different point.
Introduction to Test Driven Development (TDD) for iOS apps (Part 1 of 4)

Filed in iDevBlogADay, iOS Development | Comments (0) |

Introduction to Test Driven Development (TDD) for iOS apps (Part 1 of 4)

After a recent developer meetup, we were talking about useful things to do at future meetings. Someone fairly new to iOS development mentioned he would love to watch someone go through the design and development of an app. He knew he could pick up many of the technical details himself, but he wanted a better understanding of the thought process and design decisions behind the development.

As with any process that requires insight and creativity, that process and those decisions vary a great deal from person to person. Even if a particular process or development approach does not fit your style, you can still learn and improve by understanding different approaches.

Test Driven Development (TDD)

TDD is an approach to development that uses automated software tests to drive the design and development of an application iteratively. It pushes the developer to focus on one thing at a time, and usually one fairly small thing at that — but without killing the forest while tending to individual trees.

One of the central practices of TDD is to write a test for some chunk of code before we write any code. The reasoning is that if we correctly express all of our expectations through our tests, when our tests pass, we know our application does what we want. So the success of our application is highly dependent not just on understanding the problem, but on how well we capture that understanding in our tests.

We will explore TDD in this tutorial by developing a simple iPhone app that plays Tic-Tac-Toe. Because our focus is on TDD, we will spend most of our time learning how to think in a “test first” manner.

Is TDD Really Worth The Effort?

There are good developers out there that think TDD is not a useful approach so we need to try and separate the arguments against writing unit tests vs doing testing the TDD way.

The arguments against unit testing in general are things like:

  • I don’t have time to write double the amount of code,
  • As the number of tests increase, they become too unwieldy to maintain,
  • Changing the API breaks too many tests, so I become hesitant to make needed changes or end up disabling tests.

I won’t debate these other than to say that there is a minimal level of testing that I view as a requirement for professional work. It’s not that I always live up to my own standards, but I am not delivering the quality work I should be as a professional when I don’t have a reasonable amount of automated tests.

There are more nuanced arguments against TDD, where we write tests first instead of later. Things like:

  • There is not a good return on the time spent writing tests for every new bit of functionality,
  • Keeping such as narrow focus can lead to a local optimization, but poor overall design,
  • It is too easy to get lost in the details and lose sight of the big picture.

I am not a TDD purist. I won’t argue that TDD is always the best way for every project, but even if you take a hybrid approach, I believe you will still find great value. Using tests as a mechanism to force myself to stop and think about how the proposed code will be used is very helpful. Writing a good test usually requires me to think at just the right level of detail.

As far as getting lost in the weeds, I have not found that to be any bigger danger than using any other method. In fact, I can be led down a false trail or a tangent more often if I do not have the specification that the test provides. Using TDD does not mean you never step back and evaluate the overall design — in fact, I encourage you to do so at various points along the way. You need those review points to make sure you are staying true to the overall purpose and goals of the application.

I recently finished a short iOS project as a subcontractor where I followed standard TDD techniques fairly closely. I wrote a blog entry summarizing my experience that may help you as you think through using TDD.

Wherever you fall in this discussion, I encourage you to spend enough time exploring TDD to make an informed decision. Even if you conclude TDD techniques are not for you, I hope you still benefit by spending some time thinking differently about app development.

Getting Started 

You will learn the most from this tutorial by following the steps and doing the work yourself, but if you get stuck, see the note at the end of the tutorial to see how to jump to specific points in the tutorial.1

We will be using GHUnit for our testing framework, and later will use OCMock in our tests as well. Since the point of this tutorial is to learn about TDD, not configure Xcode, I have provided an empty Xcode 4 project already configured with two targets: an empty view based app, and a GHUnit app test target configured with OCMock support and a sample test case. There are other frameworks available that can help in our testing, but we will keep our project dependencies as simple as possible for this tutorial.

If you would like to help in setting up your own Xcode 4 project to use GHUnit, check out the tutorial “Unit Testing in Xcode 4 Quick Start Guide”.

Once you download and unzip the project file, open it in Xcode and run the TDD_TicTacToe target in the simulator. It does not do much at all, but should look like this:

TDD TicTacToe 1

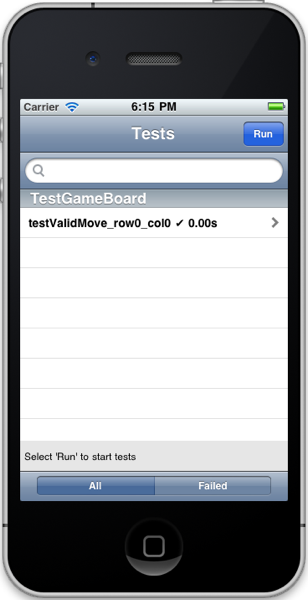
Next, run the TDD_TicTacToeTests target in the simulator, it should look like this:

TDD TicTacToe 2

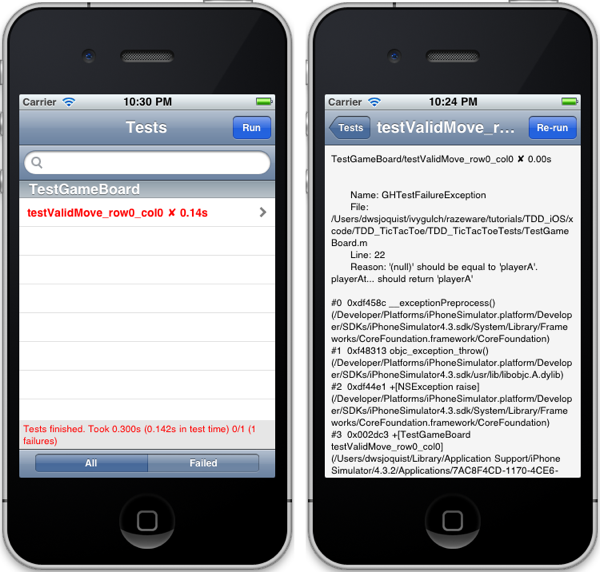
To see how GHUnit runs tests and ensure that GHUnit and OCMock are setup correctly, I included four test cases in the sample test class. By default two pass, and the other two fail. To run the tests, click the “Run” button on the top right and the resulting screen should look like this:

TDD TicTacToe 3

Congrats! We are ready to begin our TDD journey.

TDD Process

TDD grew out of the work of people like Kent Beck, Ward Cunningham, Martin Fowler, and Ron Jeffries as eXtreme Programming (XP) came into being in the 80’s and 90’s. Even though there is not an official, globally sanctioned definition of TDD — the best descriptions still come from Ward Cunningham’s c2 site.

Following TDD does not magically remove the need to understand the problem we are addressing, and so before writing even a single test, we need to take care of a few things. We need to:

  • Decide on the purpose of the app;
  • Determine what constitutes “Done”;
  • Do just enough up front design to get started.

TDD is an iterative process where each iteration has a clear task to accomplish — an iteration is complete when all existing test cases pass. An individual iteration can be focused on adding some new behavior or improving the existing design, but it is better not to try to do too much at once. By limiting the scope, if any of our tests break during that iteration, we can quickly find the cause.

It is helpful to keep an active task list to record observations as we find new things to be done, or changes to be made. This will help us stay focused on the current task.

Most iterations will be to add new behavior, and look something like this:

  • Based on our current understanding and task list, decide on what behavior we want to add next;
  • Think about a good way to test it;
  • Write a small test that uses that behavior and clearly expresses our expectation of the results;
  • Write just enough code that will let the test compile, but still fails because our expectations were not met;
  • Run the test and watch it fail so we know we the test is being exercised;
  • Write or modify just enough code to make the new test pass;
  • Ensure all existing tests still pass.

When we are tempted to follow a rabbit trail during this process, the best choice is to record whatever potential new feature or modification that has distracted us, and then get back to finishing the task at hand. The keys to making TDD work well are keeping iterations as short as possible and to staying focused on the current task.

After an iteration is complete (remember this means all existing test cases pass!), we might decide to modify our design somehow. Resist the urge to add new features during this iteration: we must keep our focus on the refactoring. For instance, an iteration to simplify our API might look like this:

  • Identify the specific method signature that needs to be changed;
  • Remove or consolidate the arguments that are not needed or overkill;
  • Run the entire set of test cases as often as we are able;
  • When we are pleased with the new method signature, and all the tests pass, the task is complete.

At each step during this process, the entire suite of tests is run often to make sure no existing behavior is inadvertently broken. Early in the process, our task list will continue to grow, but eventually it will begin to diminish until there are no more tests to write and we are satisfied with the design.

TDD adherents find many benefits from following this approach. The main advantage I find is that I am never very far from having working code, however incomplete it is in early stages.

Up Front Planning and Design

We want to write a Tic Tac Toe game where a human player plays against the computer. Following the principle “Do the simplest thing that could possibly work”, we need to think about the minimum features a game like this needs, and the simplest model that supports those features.

A minimal Tic Tac Toe game probably needs at least the ability:

  • for a human player to enter their move;
  • for a computer player to choose a move;
  • to track the state of the game;
  • to check whether moves are valid;
  • to start the game;
  • to know if someone wins;
  • to know if the game is a draw.

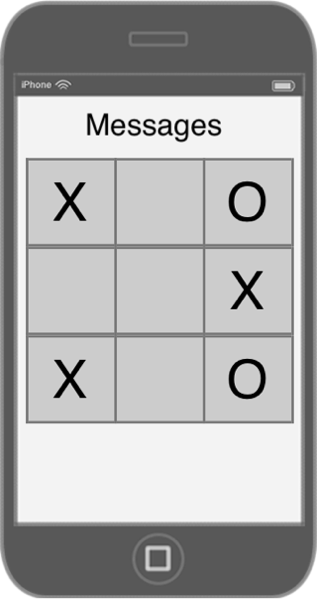
At this point some sort of high level sketches or mockups can be useful in guiding our thinking, as long as we don’t get bogged down in low-level details too soon. For our game, we want something very simple, a visual representation of the game board, and a simple message label to let the player know when it is their turn or if the game is over for some reason. Something like this:

TDD TicTacToe 4

One simple design that supports those features is to have two Player objects, a GameBoard, a GameManager, and a GameView/GameViewController (a simple UIKit based GUI) for actual gameplay.

Since we are not keeping score or tracking anything other than a single game, our players can be very simple objects — in fact, an instance of a string to hold a name is sufficient.

The GameBoard will handle keeping track of the current positions, validating moves, and checking for a winner or a draw.

The GameManager will manage starting a game, tracking the players and their turns, selecting a move for the computer player, and any other interactions with the GameBoard.

We will keep the user interface components very simple for our game, probably nothing more than some UIButton and UILabel objects.

Armed with this very simple description, we are now ready to begin the actual development.

Development 

Remember, you will learn the most from this tutorial by following the steps and doing the work yourself, but if you get stuck, see the note at the end of the tutorial to see how to jump to specific points in the tutorial.1

Our first test

Since our GameManager will need to interact with our GameBoard and players, and initially our player objects will be simple strings, it is probably easiest to begin development of our GameBoard class.

Before we create our GameBoard test cases, we should delete the SampleTest.m file from the TDD_TicTacToeTests folder in our Xcode project.

Now lets add a subclass of GHTestCase for our GameBoard test cases:

  • Right click the TDD_TicTacToeTests folder, and select ‘New File’;
  • Create a file named ‘TestGameBoard.m’ in the TDD_TicTacToeTests folder;
  • Select “Cocoa Touch”, “Objective-C class”;
  • Make it a subclass of GHTestCase;
  • Uncheck the TDD_TicTacToe target, and check the TDD_TicTacToeTests target;
  • Save As ‘TestGameBoard.m’.

We do not need a separate .h file for our test classes, but unfortunately Xcode 4 no longer gives us the option to leave it out. Delete the TestGameBoard.h file from TDD_TicTacToeTests, then make sure our TestGameBoard.m file looks like this:

// ttt_1_001

#import <GHUnitIOS/GHUnitIOS.h>
#import <OCMock/OCMock.h>

@interface TestGameBoard : GHTestCase { }
@end

@implementation TestGameBoard

@end

At this point, build and run the TicTacToeTests target in the simulator to ensure Xcode finds all the appropriate libraries. Now it is time to decide what we should test first.

Since the GameBoard is all about tracking the state of the game, a good place to start is to test for valid and invalid moves. But, we have already run into some missing pieces from our design: How should we track our moves and the game board itself? Fortunately for us, we don’t have to decide everything at once — lets just decide how we want to address each potential move.

Since traditional Tic Tac Toe is played in a 3×3 grid, the simplest approach is to simply reference the row and column number of the move. For convenience sake, lets use zero based notation. So, a valid row would be 0, 1, or 2, and likewise for columns. We now have done enough design work to write our first test case.

Add this method to TestGameBoard.m:

// ttt_1_002

- (void) testValidMove_row0_col0 {
    GameBoard *gameBoard = [[GameBoard alloc] init];
    
    [gameBoard movePlayer:@"playerA" row:0 col:0];
    GHAssertEqualStrings([gameBoard playerAtRow:0 col:0], @"playerA", 
                         @"playerAt... should return 'playerA'");
    
    [gameBoard release];
}

This test case instantiates a new gameBoard, attempts to make a move for playerA, and then verifies that the gameBoard actually accepted the move by using a GHUnit macro “GHAssertEqualStrings”.

Being reasonably observant, you of course realize we have not yet written a GameBoard class, let alone any methods. Before we can even run the tests, we need to create a GameBoard class — after all, we don’t yet know if our test suite will find our test and run it since we cannot currently compile our project.

Add a new Objective-C class, ‘GameBoard.m’ to the TDD_TicTacToe folder. You will need to make sure you add ‘GameBoard.m’ to both the ‘TDD_TicTacToe’ target and the ‘TDD_TicTacToeTests’ target. (Because we are testing classes that reside in an Application target, we will always need to make sure we include them in both targets.)

We then need to add the import statement to TestGameBoard.m:

// ttt_1_002

#import "GameBoard.h"

Now if we try to build our project, it does compile, but with warnings that GameBoard may not respond to our methods. If we ran our tests now, with our project configured the way it currently is — our GHUnit test application crashes, which is not particularly very useful. The best method I have found when doing TDD with Xcode and GHUnit, is to add the method being tested to the class under test, but with no behavior.

Add these methods to GameBoard.h:

// ttt_1_002

@interface GameBoard : NSObject {
}

- (void) movePlayer:player row:(int) row col:(int) col;
- (NSString *) playerAtRow:(int) row col:(int) col;

@end

And empty implementations to GameBoard.m:

// ttt_1_002

@implementation GameBoard

- (void) movePlayer:player row:(int) row col:(int) col {
}

- (NSString *) playerAtRow:(int) row col:(int) col {
    return nil;
}

@end

I expect our test to fail, since our implementation does nothing. Run the TDD_TicTacToeTests target in the simulator, then touch the “Run” button to execute the tests and our test case ‘testValidMove_row0_col0’ is displayed in red since it failed.

If we select the red test case in the table view, the GHUnit application will display the log output specific to this test, as in the image on the right:

TDD TicTacToe 5

We already know the cause, we did not implement anything — but seeing the test fail lets us know that in the future, if we change something that affects our expected results, our test will catch it.

This is more than just a casual reassurance. If we consistently write tests for everything we care about in our app, our confidence in making changes greatly increases. This is turn means that we can focus on the one thing we are doing, and not worry about bad side effects because we know that our tests will tell us if we break something.

I find many similarities between TDD and the GTD techniques described by David Allen in “Getting Things Done”. Both approaches give us a system where we can keep track of details without consciously and constantly thinking about them. If we are consistent with either system, our minds will know we have everything covered, and it will let us focus on our current task without those nagging “I wonder if I remembered…” thoughts coming to the surface.

Now that we have a failing test, we can write just enough code to make it pass. At this point it is very tempting to stray from the task at hand and do more than we need to make the test pass. We might be tempted to add code to store the game grid or something like that, but that is not necessary to make this test pass. In fact, there are real dangers in doing that.

The potential dangers in writing more code than you need right now include:

  • You will be writing code that does not yet have a test to validate it;
  • You will be tempted to skip writing the test later;
  • You might split your focus between too many things;
  • You will probably write code than is not necessary.

Deciding how much and what code to write is a judgment call, but it is better to err on the side of simplicity. For our example game, you could make an argument that now is a good time to add a very simple storage grid. But, lets keep things incredibly simple at this point and first make this pass. We need to remember the player that made a move and return it when asked, so add a single ivar to our interface:

// ttt_1_003

@interface GameBoard : NSObject {
    NSString *player_;
}

And remember it when we make a move:

// ttt_1_003

- (void) movePlayer:player row:(int) row col:(int) col {
    player_ = player;
}

- (NSString *) playerAtRow:(int) row col:(int) col {
    return player_;
}

Now when we rerun our tests, we should see the test case pass:

TDD TicTacToe 6

We have taken a while to get to this point, and it is obvious to most anyone that our current implementation is not really very useful, and almost silly. But that will begin to change quickly as we add more tests.

Our second test

Knowing that our implementation is weak, we decide our second test should be to make moves by two different players to two different positions and validate the moves. So, add this test case to TestGameBoard.m:

// ttt_1_004

- (void) testTwoValidMoves {
    GameBoard *gameBoard = [[GameBoard alloc] init];
    
    [gameBoard movePlayer:@"playerA" row:0 col:0];
    [gameBoard movePlayer:@"playerB" row:1 col:1];

    GHAssertEqualStrings([gameBoard playerAtRow:0 col:0], @"playerA",  
                         @"playerAt 0 0 should return 'playerA'");
    GHAssertEqualStrings([gameBoard playerAtRow:1 col:1], @"playerB",  
                         @"playerAt 1 1 should return 'playerB'");
    
    [gameBoard release];
}

When we run our tests, we see that our new test case fails, and when we click on the test case name to see more details we see why:

TDD TicTacToe 7

This test reveals what we already suspected (okay, what we already knew). Our implementation is not good enough for our killer Tic Tac Toe app. We now need to think for just a minute about what the simplest thing we could do to make both tests pass. At this point, I think it is safe to say that some sort of grid storage is the simplest reasonable thing we can do to make both tests pass, so lets change our implementation from a single ivar to an array.

// ttt_1_005

@interface GameBoard : NSObject {
    NSString * board_[3][3];
}

...

@implementation GameBoard

- (void) movePlayer:player row:(int) row col:(int) col {
    board_[row][col] = player;
}

- (NSString *) playerAtRow:(int) row col:(int) col {
    return board_[row][col];
}

@end

Once again, we run our tests. Seeing them both pass after our simple change begins to give us confidence that we are on the right track.

Now that we have two successful tests under our belt, it is time to take a small step back and evaluate the entire system as it stands to see if there are redundancies we can eliminate or other areas that should be refactored. Our implementation is still so simple that there is no real gain to be had yet in refactoring. But, there is a redundancy in our test class itself — we are creating a new gameBoard for each test, then releasing it. GHUnit, like other xUnit frameworks, gives us some methods to help. Let’s implement the ‘setUp’ and ‘tearDown’ methods like this in TestGameBoard.m:

// ttt_1_006

@interface TestGameBoard : GHTestCase { }
    GameBoard *gameBoard;
@end

@implementation TestGameBoard

- (void) setUp {
    [super setUp];
    
    gameBoard = [[GameBoard alloc] init];
}

- (void) tearDown {
    [gameBoard release];

    [super tearDown];
}

- (void) testValidMove_row0_col0 {
    [gameBoard movePlayer:@"playerA" row:0 col:0];
    GHAssertEqualStrings([gameBoard playerAtRow:0 col:0], @"playerA",
                         @"playerAt... should return 'playerA'");
}

- (void) testTwoValidMoves {
    [gameBoard movePlayer:@"playerA" row:0 col:0];
    [gameBoard movePlayer:@"playerB" row:1 col:1];
    
    GHAssertEqualStrings([gameBoard playerAtRow:0 col:0], @"playerA",
                         @"playerAt 0 0 should return 'playerA'");
    GHAssertEqualStrings([gameBoard playerAtRow:1 col:1], @"playerB",
                         @"playerAt 1 1 should return 'playerB'");
}

@end

Since we made a change, we need to re-run our tests to ensure we didn’t break anything. Unless there is a typo or copy and paste error, our tests should still pass.

Occasionally while we are focused on one task something will come to mind that we need to remember about a different task. GTD has some applicable advice for us in this situation — we need to capture that thought into some system you trust, and then move back to what we were doing. In our case, while writing tests, making them pass, or refactoring code, we will realize other tests that need to be written, or other refactorings that need to happen.

For instance, while writing the second test and making it pass, several things came to mind that need to be tested, so let’s add a text file ‘todo.txt’ to our ‘TDD_TicTacToe’ target with these entries:

// ttt_1_007

Tests to add:
- test that GameBoard detects moves outside valid range
- test that GameBoard detects when a makes an invalid move (selects a move already made by a player)
- test that GameBoard to make sure only two players can be used for a given game

Next Time

We clearly still need a number of features and tests.

  • In part one we introduced Test Driven Development (TDD), briefly discussed how it can help your development, and began the process using a simple Tic-Tac-Toe game as our app.
  • In part two we will focus on how to think in a TDD fashion while we finish testing our model, the GameBoard class.
  • In part three will will finish a stand-alone version of our game.
  • In part four we will add some interaction with outside services to demonstrate how to use mock objects to help us test our code’s use of external services.

Here is the project as of this point with all of the code from the above tutorial.

In the meantime, if you have any questions, comments, or suggestions, feel free to add them below!


DwsjoquistWe all need the support of others to do our best work. Find other like-minded developers that will provide encouragement and motivation through local user groups, conferences or meetups. A great collection of indie iOS developers have helped me stay on track through meetups, 360iDev, twitter, and iDevBlogADay.

I regularly attend Cocoa/iPhone developer meetups in Cincinnati, Ohio and Columbus, Ohio. If you are in the central or southwest Ohio area, come join me at either monthly meetup:

Finally, here is a little more information about me, Doug Sjoquist, and how I came to my current place in life. You should follow me on twitter and subscribe to my blog. Have a great day!


1. If you get stuck, you can use the provided zip file of the full project for this tutorial. I recommend unzipping it into a separate location so you can use it to compare to your own project.

Return to ‘Getting Started’
Return to ‘Development’

The zipped project is the end state of this tutorial, but it is possible to skip back and forth to specific points in the tutorial if you are willing to use some commands in a terminal window.

The zipped project file includes a git repository with tags for most steps we took in this tutorial. Each code listing includes a comment specifying the tag that corresponds to the current point in the tutorial, like this:

// ttt_1_000
...

Tag names are just simple labels, and this tutorial uses a very simple convention: a prefix of ‘ttt_1_’ and a three digit sequential number. (The starting point of the work we have done is tag ‘ttt_1_000’.) To avoid confusion and clutter, the tutorial itself does not reference git or tags other than to include the appropriate tag in the comments of code listings.

Unfortunately, even though Xcode 4 has built in support for git, that support does not include tags. To make use of them, you must open up a terminal window, change to the base directory of the project, and issue two basic git commands from there.

For instance, if you unzipped the project file into the directory ‘~/tmp’, you would follow these steps to jump back to the beginning of the tutorial:

Open up a terminal window and enter these commands (the prompt may look different, just type what is in bold):

localhost:~ $ cd ~/tmp/TDD_TicTacToe
localhost:~/tmp/TDD_TicTacToe $ git checkout .
localhost:~/tmp/TDD_TicTacToe $ git checkout ttt_1_000

Switch back to Xcode
Build the project
Run the TDD_TicTacToeTests target in the simulator

The git checkout . (don’t forget the ‘.’ at the end) discards any changes you made to provide a clean slate for the next step. It may not always be necessary, but it doesn’t hurt either.

The git checkout ttt_1_000 then moves the project files to the appropriate point in the tutorial.

If you leave the terminal window open, you can simply issue the git commands whenever you like to jump to a different point.

Writing Is Hard — Let’s Do Math

Filed in iDevBlogADay | Comments (0) |

Tutorials ‘R Us

Several months ago, Ray Wenderlich put out a call for developers to write for his excellent tutorial site. So, I put my name in the hat, joined the team, and signed up to for my first tutorial in May: “Test Driven Development with iOS”.

Part way through, we decided that it needed a separate, smaller tutorial on setting up the test environment first, so I wrote Unit Testing in Xcode 4 Quick Start Guide which was published in early June.

Before very long, my small tutorial needed to grow into two parts. After working for a couple more weeks, it turned into a three-parter, and currently stands as a four-parter. After two months, it started to seem as though the more I wrote, the further the end was moving away. In the last month or so, I have finally started getting closer to the end as I write. But, given my current work load, it is very unclear when the end will come.

Ray has been very gracious and patient, but we both decided it was not to be.

Parts one and two are complete. Part three needs a final review, but is fundamentally complete. My plan now is to release the tutorial on my site as part of my iDevBlogADay posts, and hope that I can finish part four before it is time to publish it!

So, stay tuned next time for “Introduction to Test Driven Development (TDD) for iOS apps — Part 1”.

An Ode’ To Writing Tutorials

Sung to the tune of “Beverly Hillbillies” (but not aloud please 🙂

Come and listen to the story about a guy named Doug
A poor blog writer, barely kept his blog feed up,
Then one day he read his twitter stream,
And there saw a plea for a writer team.

Words that is, blog posts, steady stuff.

Well the first thing you know Doug says I'll take that gig,
It seems so cool, why not dig right in,
How hard can it be to keep up with this and that,
So he loaded up MarsEdit, and signed with R & V.

Readers, that is,
Analytics, Followers.


...much time passes (too much)...


Well now its time to say good-bye to Ray and all his team.
And I would like to thank him for kindly waitin' long.
You're all invited back again to Ray Wenderlich dot com
To have a heapin helpin of great tutorials.

We all need the support of others to do our best work. Find other like-minded developers that will provide encouragement and motivation through local user groups, conferences or meetups. A great collection of indie iOS developers have helped me stay on track through meetups, 360iDev, twitter, and iDevBlogADay.
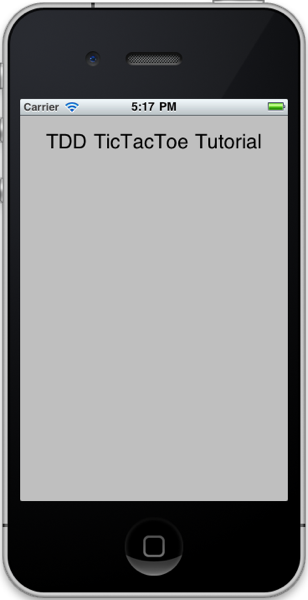
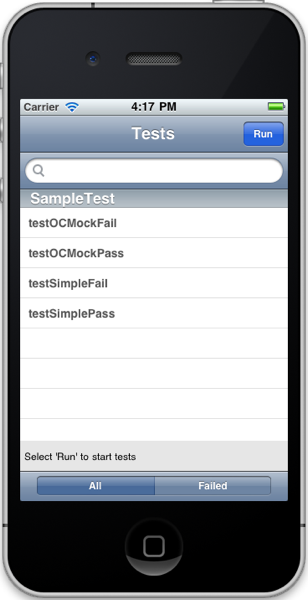
I regularly attend Cocoa/iPhone developer meetups in Cincinnati, Ohio and Columbus, Ohio. If you are in the central or southwest Ohio area, come join me at either monthly meetup:

Finally, here is a little more information about me, Doug Sjoquist, and how I came to my current place in life. You should follow me on twitter and subscribe to my blog. Have a great day!

Live From 360iDev!

Filed in 360iDev, iDevBlogADay, iOS Development | Comments (0) |

Live From 360iDev!

360iDev 2011 is in full swing, and it’s been great so far.

My OCMock Session On Sunday

I gave an updated presentation/training session on OCMock Sunday morning entitled “OCMock: Crash Test Dummies For Your Code”. Overall, I was pleased with how it went. It was a three hour session, so we took the first half to briefly discuss what mock objects were about, and then went through the fundamental features of OCMock using test cases to demonstrate each one. The demonstrations led to some good discussion with the group (about 40-50 devs) about testing in general, TDD, and OCMock. I was encouraged by the number of people that participated in the discussion, and I learned as much from it as the group did.

After a break, we talked a little more about how to make good use of mock objects, and then I took the plunge into a live coding session, which is always a risk. To mitigate the risk I had scripted the entire sequence and practiced it several times. I used a simple text file with all the code blocks I needed so I could just talk, cut & paste, and demonstrate each step.

Unfortunately, I chose to veer from the script early on (foolish!), made a simple mistake, and spent 10-15 minutes trying to clear it up. What I should have done was remove what I had just done and get back on script, but I ended up stumbling around and feeling foolish. Eventually, I came to my senses and just opened up the finished project to show what I had intended to do in the first place. Then I was able to mostly, but not completely, return to my script and finished the session a little better (but not great).

Later that afternoon, I reopened the project I had built live during the session and fixed my dumb mistake in under 2 minutes. Oh well, hopefully I’ll remember to stick to the script next time, or approach things differently.

Mingling With Other Developers

One of the best things of a good conference is meeting new colleagues and renewing friendships with folks I haven’t seen since the last conference. Sunday night I had a great time mingling at the opening reception and learned as much from others that night as I did in the sessions. My son Nathan, a recent college grad, is just starting into iOS development and it was great to introduce him to some successful, experienced game and app developers. Hopefully, it provided some great motivation for him, I know it motivated me!

After today’s session, there was more great conversations around dinner with a group of around 20 (and a very accommodating waitress) — more fuel to stoke the fire and excitement about developing cool stuff for iOS devices.

Monday Sessions

I enjoy the variety of sessions at 360iDev. I attended design, development, and business development sessions today and learned from each. All were well done and taught me things I didn’t know or motivated me to improve in areas I’m already doing. I’m looking forward to a lot more great stuff in the next two days.

Looking Forward to the GameJam on Tuesday

Nathan and I will be working together at the GameJam tomorrow night, and I’m really looking forward to see what we can come up with! I’ve really enjoyed past GameJams, and I’m sure this will be even better working together. Santiago & Charlie (two young 360iDev veterans) are back again, and it will be great to have them at the GameJam again as well!

I’m going to try to call it a night early tonight so I have the energy for a late night session tomorrow.

I’d encourage anyone who does iOS for a living or a hobby, full or part time, to consider 360iDev next year — it is a great investment that pays great dividends.


This is my first post on the new iDevBlogADay schedule, and since I missed my first slot of the new schedule, I am thankful for the forgiving nature of the new style.

We all need the support of others to do our best work. Find other like-minded developers that will provide encouragement and motivation through local user groups, conferences or meetups. A great collection of indie iOS developers have helped me stay on track through meetups, 360iDev, twitter, and iDevBlogADay.
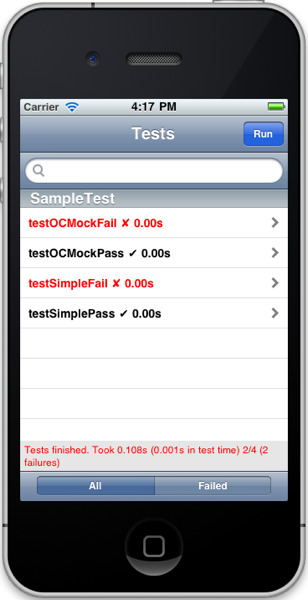
I regularly attend Cocoa/iPhone developer meetups in Cincinnati, Ohio and Columbus, Ohio. If you are in the central or southwest Ohio area, come join me at either monthly meetup:

Finally, here is a little more information about me, Doug Sjoquist, and how I came to my current place in life. You should follow me on twitter and subscribe to my blog. Have a great day!

CocoaConf slides and project

Filed in CocoaConf, iOS Development | Comments Off on CocoaConf slides and project |

CocoaConf in Columbus was a great conference packed into two full days. The shorter length made it easier to fit into my schedule, but the downside was the limited amount of time I had to talk with other developers.

My talks on “TDD in the iOS World” went reasonably well. Better than I hoped in some ways, not as good as I wanted in others. Thanks to all who came, and took the time to write some comments!

I got some good feedback from the the session evaluations. If I were to do it over again, among other things, I would:

  • Be clearer about the session content,
  • Shorten the overview of TDD, I think 10-15 minutes would have been a better fit for the audience,
  • Do the code portion directly in Xcode, do more code examples live.

btw, when you go to conferences, it is very helpful when you write comments about specific things, good or bad. General ratings are nice, but even a single specific comment is greatly appreciated.

I did not upload my project files and slides to the CocoaConf site until Saturday evening, so they did not make it into the bundle (yet). I’m sure they will be available at http://www.CocoaConf.com soon, but for now, here they are:

I am looking forward to seeing CocoaConf in Columbus next year.

Thanks to all the Klein crew, speakers, and participants!